December 30, 2014

Middle Eastern Salad

No comments:
Yum
Here is a great recipe for a simple and delicious salad that is very common in the Middle East. Some call it an Israeli salad, but I believe it is made (with slight variations) across the region. Enjoy!


Middle Eastern Salad

Yield: 8 servings
Ingredients
  • 1 lb cucumbers, diced
  • 1 lb tomatoes, diced
  • 1/2 cup fresh parsley, minced
  • 3 tablespoons olive oil
  • 3 tablespoons lemon juice
  • salt
Cooking Directions
  1. Mix all ingredients together. Add salt to taste.
  2. Best served immediately, as the salt will extract the juices from the vegetables and make it more liquidy.

December 17, 2014

Oleana's Whipped Feta

No comments:
Yum
Maybe you've been to Oleana, one of the best restaurants around Boston, and maybe you haven't but you love feta. This recipe will give you a beautiful whipped feta spread that goes great with cucumbers, bread, or just plain. If you've had Oleana's, let me know how this compares. Enjoy!

Oleana's Whipped Feta

Yield: 1+ cups
Ingredients
  • 1 roasted red pepper
  • 1/2 pound feta cheese
  • 2 teaspoons crushed red pepper
  • 1/4 teaspoon smoked paprika
  • 1 teaspoon lemon juice
  • 1/8 cup olive oil
Cooking Directions
  1. Discard the skin of the peppers and pulse a couple times in a food processor.
  2. Add remaining ingredients and blend the mixture for about 2 minutes, until very smooth.
  3. Refrigerate for about 30 minutes before serving to allow the dip to set.

December 03, 2014

New York Street Cart Chicken and Rice

No comments:
Yum
If you've ever had the chicken and rice from the Halal Guys in New York (or just about any of the other carts), you've likely dreamed about making it at home too. Here's a recipe for that deliciousness that closely hits the mark. Enjoy!


New York Street Cart Chicken and Rice

Yield: 6-8 servings
Ingredients
    For the chicken:
  • 2 tablespoons lemon juice
  • 1 tablespoon dried oregano
  • 1/2 teaspoon ground coriander
  • 3 garlic cloves, chopped
  • 1/8-1/4 cup olive oil
  • salt and pepper
  • 2 pounds boneless, skinless chicken thighs, trimmed of fat
  • 1 tablespoon canola oil
  • For the rice:
  • 2 cups rice, uncooked
  • 1/2 teaspoon turmeric
  • 1/4 teaspoon ground cumin
  • water
  • salt and pepper
  • For the white sauce:
  • 1/2 cup plain yogurt
  • 1 tablespoon vinegar
  • 1 teaspoon lemon juice
  • 1/4 cup fresh parsley
  • salt and pepper
  • To serve:
  • 1 lettuce, shredded
  • 1 tomato, cut into wedges
Cooking Directions
  1. For the chicken: Combine the lemon juice, oregano, coriander, garlic, and olive oil in a ziploc bag. Season the marinade to taste with kosher salt and black pepper. Place the chicken in the bag. Turn the chicken to coat, seal the bag, and marinate the chicken in the refrigerator for 1 to 4 hours, turning occasionally to redistribute the marinade.
  2. Remove the chicken from the bag. Season with kosher salt and a lot of pepper. Heat the canola oil in a large skillet over medium-high heat until it is lightly smoking. Add the chicken pieces and cook without disturbing until they are lightly browned on the first side, about 4 minutes. Flip the chicken and reduce the heat to medium. Cook until the chicken is cooked through, about 6 minutes longer. Transfer the chicken to a cutting board and allow to cool for 5 minutes.
  3. Roughly chop the chicken into 1/2- to 1/4-inch chunks. Transfer to a medium bowl, add the marinade, cover, and refrigerate while you cook the rice and prepare the sauce.
  4. For the rice: Put rice in rice cooker. Add the turmeric and cumin. Add water to the suggested amount for 2 cups. Season with salt and pepper. Cook as normal.
  5. For the white sauce: In a small bowl, combine the yogurt, vinegar, lemon juice, parsley, and 2 teaspoons black pepper. Season to taste with salt.
  6. To serve: Return the entire contents of the chicken bowl to the skillet. Cook over medium-high heat, stirring occasionally, until heated through. Pile the chicken on top of the rice and lettuce. Top with the white sauce. Serve immediately.

November 19, 2014

Base Frittata Recipe

No comments:
Yum
This is merely a base recipe for a frittata. You can put pretty much anything you want in a frittata, as long as you cook certain things beforehand. Some vegetables definitely need to be cooked before going in the oven, along with any meat you might use.

As you can see, we topped ours with avocado. Yep, delicious. Enjoy!


Base Frittata Recipe

Yield: 6-8 servings
Ingredients
  • 12 eggs
  • 3 tablespoons water
  • 1/4 teaspoon salt
  • 1/4 teaspoon black pepper
  • 1 teaspoon herbs
  • 1 onion, chopped
  • 1/2 lb vegetables
  • 2 teaspoons oil
Cooking Directions
  1. Adjust oven rack to upper-middle position.
  2. Whisk eggs, water, the salt, the pepper, and herbs in medium bowl until well combined. Set eggs aside.
  3. Heat oil in 12-inch oven-safe skillet over medium heat until shimmering. Add onion and cook until it softens slightly. Add vegetables and cook until beginning to brown.
  4. Turn on broiler.
  5. Add egg mixture to skillet and cook, using spatula to stir and scrape bottom of skillet, until large curds form but eggs are still very wet, about 2 minutes. Shake skillet to distribute eggs evenly; cook without stirring for 30 seconds to let bottom set.
  6. Put skillet under broiler and broil until frittata has risen and surface is puffed and spotty brown, 3 to 5 minutes.
  7. When cut into with a knife, eggs should be slightly wet and runny. Remove skillet from oven and let stand 5 minutes to finish cooking.
  8. Using spatula, loosen frittata from skillet and slide onto cutting board. Cut into wedges and serve.

October 08, 2014

Homemade Tofu

No comments:
Yum
Tofu is very easy to make at home. It takes a little time, and a little more hands-on time than Tempeh, but it's worth it. Normally, you need fancy ingredients to coagulate the tofu, but here we have a method using citric acid, which you might have around if you make cheese. Since it does use citric acid, it might be a little more tangy than you're used to. It pairs nicely with soy sauce and garlic. Enjoy!


Homemade Tofu

Yield: 4 servings
Ingredients
  • 200 g soy beans
  • 1/2 teaspoon citric acid
  • water
Cooking Directions
  1. Soak the beans for at least 8 hours.
  2. In a food processor, grind the soaked soy to a fine paste, like hummus almost. Add water if needed.
  3. In a large pot add enough water to the paste to bring it to milk consistency.
  4. Bring it to boil then switch to a simmer. Let it simmer on low flame for 15 minutes.
  5. Line a sieve with a cloth and filter the milk. The result is soy milk. The byproduct after filtering the milk is called okara. This is rich in protein.
  6. Mix citric acid to 1/4 cup water. Add this solution to the soy milk and stir it once. Then let it stay for 5 minutes.
  7. The milk will curdle. Filter this through a cloth-lined sieve.
  8. Squeeze out the water or keep the filtered tofu on a flat surface and cover it with the cloth on all the sides. Keep some heavy object on top and leave it for 30 minutes or to desired firmness.
  9. Remove weight and open the cloth. Cut it into small pieces and use.

September 24, 2014

Chinese Chicken Salad

No comments:
Yum
Here is a recipe passed down from grandma to ma to my wife. She loves to make this. It's like a nostalgic reminder of her childhood, especially the holidays. Personally, I could do without the maifun, so if you don't want it, try it without.

This recipe also walks you through cooking and shredding the chicken, but if you already have some on hand or prefer another method, I'd love to hear it! Enjoy!


Chinese Chicken Salad

Yield: 8+ servings
Ingredients
  • 2 lbs chicken breasts
  • 1 tablespoon canola oil
  • 3/4 cup water
  • salt and pepper
  • 1 head iceberg lettuce, chopped and sliced
  • 1 package maifun
  • oil for deep frying
  • 3 green onions, only the green parts, sliced
  • 1/8 cup toasted almonds
  • 1/16 cup toasted sesame seeds
  • 4 tablespoons sugar
  • 3 teaspoons salt
  • 1/2 teaspoon black pepper
  • 4 tablespoons white vinegar
  • 1/4 cup canola oil
Cooking Directions
  1. Pat the chicken breasts dry and season with some salt and pepper. In a large skillet, heat the 1 tablespoon of canola oil, and cook the chicken breasts top-side down until browned, about 5 minutes. Flip the breasts and add the water and additional salt to the water. Cover and simmer on low for 7-10 minutes, until cooked. Let cool slightly (at least 15 minutes) before shredding.
  2. Deep fry the maifun in batches until all are puffed up. Set aside on plates with paper towels.
  3. For the dressing, mix together the last 5 ingredients.
  4. When ready to serve, mix the chicken and lettuce together. Then add in the maifun, then the green onions, almonds, and sesame seeds. Finally, mix in the dressing.

September 10, 2014

Bismarck or Dutch Baby

No comments:
Yum
Sometimes called a Bismarck, sometimes a Dutch Baby, sometimes a German Pancake, and sometimes probably a whole mess of things. What it is is a baked pancake that houses some delicious fruit (if desired), and a warm, soft interior, yet crispy exterior.

Easier and quicker to make than regular pancakes and possibly even healthier because it's sugar free. This naturally no added sugar pancake will please everyone. Other variations include cooked fruit or preserves or plain with a dusting of powdered sugar and or cinnamon. Enjoy!


Bismarck or Dutch Baby

Yield: 4 servings
Ingredients
  • 1/2 stick butter
  • 1/2 cup flour
  • 1/2 cup milk
  • 2 eggs
  • 1 pear, sliced thin
  • lemon juice
Cooking Directions
  1. Heat oven to 475 F.
  2. Place butter in cast iron or oven-safe dish. Put in oven once it has reached 475 F. Melt the butter until it sizzles and then take it out.
  3. Meanwhile, mix together the flour, milk, and eggs into a batter. Do not overmix.
  4. Make sure the butter has coated the entire pan, and pour the batter into the center.
  5. Bake in the oven for 12 minutes, until it has puffed up and started to brown.
  6. Take the pan out and place the Bismarck / Dutch Baby on a plate.
  7. Sprinkle lemon juice over it and place pear slices everywhere.
  8. Roll it up and serve immediately.

August 27, 2014

Garlic Broccoli Rabe

No comments:
Yum
Here's a recipe for some simple and delicious broccoli rabe. It's basically a recipe you can employ with any green, more or less. Enjoy!

Garlic Broccoli Rabe

Yield: 4 servings
Ingredients
  • 2 bunches broccoli rabe
  • 6 garlic cloves, sliced
  • 1-2 tablespoons olive oil
  • 1/2 teaspoon crushed red pepper
  • 1/4 teaspoon salt
  • 1/2 teaspoon black pepper (optional)
Cooking Directions
  1. Rinse and drain the broccoli rabe. Cut off and discard the tough ends and cut the rest of into 2-inch pieces.
  2. Heat the olive oil in a large pot or pan. Over low heat, cook the garlic, stirring occasionally, until golden brown. Remove the garlic and set aside.
  3. Add the broccoli rabe stems to the hot oil. Cook for 3-5 minutes, covered. Add the rest of the broccoli rabe, red pepper flakes, salt, and pepper and cook, covered, over medium low heat for 5 to 10 minutes, stirring occasionally, until the stalks are tender.
  4. Add the reserved garlic, season additionally to taste, and serve hot.

August 13, 2014

Roasted Chicken Thighs

No comments:
Yum
With this basic recipe for roasted chicken thighs, you'll have tender, juicy meat every time. Play around with the different options and let me know what works best for you. Personally, I like 2 tbs white wine and 2 tbs lemon juice. Enjoy!


Roasted Chicken Thighs

Yield: 4 servings
Ingredients
  • 1 lb boneless chicken thighs
  • 2 carrots, sliced
  • 4 garlic cloves, chopped
  • 1-2 any other root or roasting vegetable
  • 2 tablespoons olive oil
  • 4 tablespoons other liquids, such as lemon juice, white wine, etc.
  • 1 teaspoon dried herbs
  • 1 teaspoon kosher salt
  • 1/2 teaspoon black pepper
Cooking Directions
  1. Heat the oven to 425°F. Place the chicken thighs in a large bowl. Add veggies to the bowl with the chicken. Add dried herbs.
  2. Add the garlic, olive oil, and other liquid to the bowl. Toss all the ingredients together, and add the salt and black pepper.
  3. Spread the chicken and veggies on a large baking sheet, arranging the veggies around the outside and placing the chicken pieces closely together in the center. Pour any remaining juices in the bowl over the chicken.
  4. Roast for 30 minutes, or until the chicken reaches an internal temperature of about 160°F. Take the pan out of the oven, and cover with foil. Let it rest for about 5 to 10 minutes before serving.

July 30, 2014

Waffle Awesome

No comments:
Yum
Inspired by the delicious Double Awesome of renowned Boston food truck fame, we present the Waffle Awesome. Instead of a scallion pancake, how about a scallion waffle? Using the yummy sourdough waffle recipe, we added scallions to the batter, but you can take any waffle and just add the scallions on top of the egg. So awesome! Enjoy!

Waffle Awesome

Yield: 1 waffle awesome
Ingredients
  • 1 waffle
  • 1 egg
  • 1 oz cheese
  • 1 scallion, sliced
  • sriracha
Cooking Directions
  1. Poach or cook the egg sunny side up.
  2. Toast a delicious sourdough waffle, but not too crispy. Cut in half.
  3. Top one half with your favorite cheese, the egg, and the scallion. Place the other half on top.
  4. Have some sriracha handy for extra spicy dipping fun.

July 09, 2014

No-Knead Artisan Bread (Whole Wheat version too)

No comments:
Yum
Here's a method without the need for a Dutch oven. Use a pan that is oven-safe, such as a cast-iron skillet. Use a metal baking dish on the bottom rack. The hot water will go into that dish when the bread goes in the oven, creating a similar steaming effect to the Dutch oven method. Voila, artisan bread! Enjoy!


No-Knead Artisan Bread

Yield: 1 large loaf
Ingredients
  • 560 g all-purpose flour (or whole wheat)
  • 1/2 teaspoon yeast
  • 2 teaspoons salt
  • 472 g water, about 70 degrees F
    •  520 g water if using 100% whole wheat
Cooking Directions if not using a Dutch oven
  1. Mix the flour, yeast, and salt in a large bowl. Add the water and stir until mixed. It will be a very sticky dough.
  2. Cover the bowl with plastic wrap or something similar. Let the dough rest for about 24-48 hours at about 70°F. It's fine if it's longer. The dough is ready when its surface is dotted with bubbles. Fold the dough once or twice during this time.
  3. Fold once or twice. Cover loosely with plastic wrap and let rest for about 15 minutes.
  4. Gently and quickly shape the dough into a ball. Leave in the bowl. If a ball does not form, don't worry about it. Cover with a towel or plastic wrap and let rise for about 2 hours. When it’s ready, the dough will be more than doubled in size.
  5. About 15-20 minutes before the dough is ready (the end of the 2 hours), heat the oven to 450°F. Put an oven-safe pan on the middle rack of the oven as it heats. Put a metal rimmed sheet or baking dish on the bottom rack as well.
  6. When the dough is ready, carefully remove the pan from the oven and turn the dough over into the pan. It won't be graceful, so just get it all in there as quickly as possible. Fill the sheet or dish on the bottom rack with 2 cups of very hot water immediately after you put the dough in the oven.
  7. Bake for 50-60 minutes, until the loaf is beautifully browned. Remove the bread and let cool on a rack.

Cooking Directions if using a Dutch oven

  1. Mix the flour, yeast, and salt in a large bowl. Add the water and stir until mixed. It will be a very sticky dough.
  2. Cover the bowl with plastic wrap or something similar. Let the dough rest for about 24-48 hours at about 70°F. It's fine if it's longer. The dough is ready when its surface is dotted with bubbles. Fold the dough once or twice during this time.
  3. Fold once or twice. Cover loosely with plastic wrap and let rest for about 15 minutes.
  4. Gently and quickly shape the dough into a ball. Put it on a piece of parchment paper. Put it back into a clean bowl if you want to keep a ball-like shape more. If a ball does not form, don't worry about it. Cover with a towel or plastic wrap and let rise for about 2 hours. When it’s ready, the dough will be more than doubled in size.
  5. About 30 minutes before the dough is ready (the end of the 2 hours), heat the oven to 450°F. Put a Dutch oven on the middle rack of the oven as it heats.
  6. When the dough is ready, carefully remove the Dutch oven from the oven and pick up the dough by the parchment paper and place into the Dutch oven. Spray the top of the dough with water and put the lid back on. Then get it into the oven.
  7. Bake for 30 minutes with the lid on, then remove the lid and bake for another 20 minutes, until the loaf is beautifully browned. Remove the bread and let cool on a rack.


June 25, 2014

The Best Roasted Brussels Sprouts

No comments:
Yum
They say simplest roasting is sometimes the best way to roast. I tend to agree. And what could be simpler than a little olive oil, kosher salt, and freshly ground black pepper?

The roasting brings out the holy-cow-I-didn't-know-Brussels-sprouts-could-be-this-delicious aspect we've all been looking for from this tiny little cabbage. Enjoy!

The Best Roasted Brussels Sprouts

Yield: 4 servings
Ingredients
  • 1 lb Brussels sprouts
  • 1 tablespoon olive oil
  • 1/2 teaspoon kosher salt
  • 1 teaspoon fresh black pepper
Cooking Directions
  1. Heat oven to 400 F.
  2. Cut off bottoms of Brussels sprouts and cut sprouts in half.
  3. In a large bowl, toss sprouts with 1 tablespoon of olive oil and the salt and pepper.
  4. Place on a large baking sheet and put on the middle rack of the oven.
  5. Cook for 15-20 minutes, flipping once and removing extra crispy pieces.
  6. They are done when soft on the inside.

June 05, 2014

Crispy Skin Salmon

No comments:
Yum
Usually, salmon is cooked so that the skin is discarded before or after cooking. Or, if it's scaled, it's soft, though still tasty. This is a mistake. Salmon skin is delicious. And when it's crispy, it's divine.

Yes, you'll have to scale the filet. Which sucks. It's just not fun, though it's not hard. But it is well worth it. Enjoy!


Crispy Skin Salmon

Yield: 4-8 servings
Ingredients
  • 1-2 lb salmon filet
  • 1-2 tablespoons oil
  • salt and pepper
  • optional: lemon juice
Cooking Directions
  1. Scale the filet. Set the oven to broil.
  2. Place in a baking dish large enough so that it lays flat.
  3. Pat dry, and rub oil over both sides of the salmon, also making sure the bottom of the dish is oiled.
  4. Salt and pepper both sides as well.
  5. Set the filet skin side up.
  6. Place the dish 4 inches from the broiler.
  7. The salmon is done when the skin is starting to darken, is crispy, and the rest of the filet appears cooked through.
  8. Serve immediately. If desired, splash some lemon juice underneath while plating, so as not to ruin the crispy skin.

May 14, 2014

Homemade Tamales

No comments:
Yum
Did you know that the singular form of tamales is tamal? Now you'll never order a tamale again. You're welcome.

Homemade Tamales

Yield: 48-60 tamales
Ingredients
  • 1/8 cup chili powder
  • 1 teaspoon kosher salt
  • 1 tablespoon paprika
  • 1/2 tablespoon garlic powder
  • 1/2 tablespoon onion powder
  • 1 teaspoon cayenne pepper
  • 1 teaspoon black pepper
  • 1/2 teaspoon cumin
  • 2 lbs cooked meat
  • 4 to 5 dozen dried corn husks
  • 2 lbs masa (yellow cornmeal)
  • 1 1/2 tablespoons kosher salt
  • 1 tablespoon baking powder
  • 7 1/2 oz (about 1 cup) lard
  • 3 to 4 cups liquid
Cooking Directions
    For the meat:
  1. In a small bowl, combine the chili powder, kosher salt, paprika, smoked paprika, garlic powder, onion powder, cayenne pepper, black pepper and cumin.
  2. Mix onto whatever cooked meat filling you already have.

    For the wrappers:
  3. Place the husks in a large bowl or container and submerge completely in hot water. Soak the husks until they are soft and pliable, at least 45 minutes and up to 2 hours.

    For the dough:
  4. Place the cornmeal, salt, and baking powder into a large mixing bowl and combine. Add the lard and, using your hands, knead together until the lard is well incorporated into the dry mixture. Gradually add enough of the reserved liquid, 3 to 4 cups, to create a dough that is like thick mashed potatoes. The dough should be moist but not wet. Cover the bowl with a damp towel and set aside until ready to use.

    To assemble the tamales:
  5. Remove a corn husks from the water and pat dry to remove excess water. Working in batches of 6, lay the husks on a towel and spread about 2 tablespoons of the dough in an even layer across the wide end of the husk to within 1/2-inch of the edges. Spoon about 1 tablespoon of the meat mixture in a line down the center of the dough. Roll the husk so the dough surrounds the meat, then fold the bottom under to finish creating the tamale. Repeat until all husks, dough, and filling are used. Optionally, tie the tamales, around the center, individually or in groups of 3, with kitchen twine.

    To cook the tamales:
  6. Stand the tamales upright on their folded ends, tightly packed together on a steamer in a large pot. Add enough water so the liquid comes almost to the bottom of the tamales. Try not to pour the broth directly into the tops of the tamales. Cover, place over high heat and bring to a boil. Remove the lid, reduce the heat to low to maintain a low simmer, and cook until the dough is firm and pulls away easily from the husk, 1 to 1 1/2 hours.
  7. Serve the tamales warm. For a 'wet' hot tamale, serve with additional simmering liquid. Store leftover tamales tightly wrapped in plastic wrap in the freezer. To reheat, remove the plastic wrap and steam until heated through.
  8. Leftover masa can be stored in the freezer as well.
Based on Alton Brown's recipe.

April 30, 2014

Chili with Beer

No comments:
Yum
Some might call this boilermaker chili. Some might call it tailgate chili. Those two names conjure up different meanings for me, especially concerning their list of ingredients, so I simply named this chili with beer.

Like all tomato sauces, this is better as leftovers, though still incredible the day of. The longer it simmers, the better it'll be too. Enjoy!

Chili with Beer

Yield: 8 servings
Ingredients
  • 1.5 pounds ground meat (can be anything with or without sausage)
  • 1/2 pound dried beans, soaked overnight, sprouted if desired
  • 1 28 oz can diced tomatoes with juice
  • 1/2 6 oz can tomato paste
  • 1 onion, chopped
  • 2 celery stalks, sliced
  • 1 carrot, sliced
  • 1 green bell pepper, seeded and chopped
  • 1 red bell pepper, seeded and chopped
  • 2 small cubes of beef bouillon
  • 1/2 cup beer
  • 2 tablespoons chili powder
  • 1.5 teaspoons Worcestershire sauce
  • 1.5 teaspoons garlic, minced
  • 1.5 teaspoons dried oregano
  • 1 teaspoon cumin
  • 1 teaspoon hot sauce
  • 1/2 teaspoon dried basil
  • 1/2 teaspoon black pepper
  • 1/2 teaspoon cayenne pepper
  • 1/2 teaspoon paprika
  • 1/4 teaspoon salt
Cooking Directions
  1. Heat a large pot over medium-high heat. Cook and crumble the ground meat into the hot pan until evenly browned. Drain off fat.
  2. Stir in the soaked beans, diced tomatoes, and tomato paste.
  3. Stir in the onion, celery, green and red bell peppers, bouillon, and beer.
  4. Stir in chili powder, Worcestershire sauce, garlic, oregano, cumin, hot sauce, basil, black pepper, cayenne, paprika, and salt.
  5. Stir together, then cover and simmer over low heat for at least 2 hours, stirring occasionally.
  6. After 2 hours, taste and adjust salt, pepper, and chili powder as desired. The longer it cooks, the better it'll taste. It'll also get better when refrigerated like most tomato sauce-based dishes.

April 16, 2014

Cinnamon Raisin Swirl Bread

No comments:
Yum

The recipe is easily doubled, and it would probably be easier to mix that way. It could do with more cinnamon flavor, so maybe double that or incorporate into the dough somehow.

Make this for Easter breakfast. Enjoy!

Cinnamon Raisin Swirl Bread

Yield: 1 loaf
Ingredients
    Dough
  • 4 tablespoons unsalted butter
  • 10 1/3 oz bread flour
  • 1 3/8 oz nonfat dry milk powder
  • 1/6 cup sugar
  • 1/2 tablespoon yeast
  • 6 oz warm water (110 degrees)
  • 1/2 egg, beaten
  • 3/4 teaspoon salt
  • Filling
  • 3/4 cup raisins
  • 1.5 tablespoons cinnamon
  • 1/2 teaspoon vanilla extract
  • 1/4 teaspoon salt
  • Egg Wash
  • 1/2 egg, beaten
  • a pinch of salt
Cooking Directions
  1. Cut butter into 16 pieces and toss with 1/2 tablespoon flour; set aside to soften while mixing dough.
  2. Whisk remaining flour, milk powder, sugar, and yeast together in bowl of stand mixer. Using stand mixer fitted with dough hook, add water and 1/2 an egg and mix on medium-low speed until cohesive mass forms, about 2 minutes, scraping down sides of bowl as necessary. Cover mixing bowl with plastic wrap and let stand for 20 minutes.
  3. Adjust oven rack to middle position and place metal loaf or cake pan on bottom of oven.
  4. Remove plastic from mixer bowl, add salt, and mix on medium-low speed until dough is smooth and elastic and clears sides of bowl, 7 to 15 minutes. With mixer running, add butter, a few pieces at a time, and continue to knead until butter is fully incorporated and dough is smooth and elastic and clears side of bowl, 3 to 5 minutes longer. Add raisins and mix until incorporated, 30 to 60 seconds.
  5. Transfer dough to large greased bowl, and using a bowl scraper or rubber spatula, fold dough over itself by gently lifting and folding edge of dough toward middle. Turn bowl 90 degrees and fold again. Turn bowl and fold dough 6 more times (for a total of 8 folds). Cover tightly with plastic and transfer to middle rack of oven. Pour 3 cups of boiling water into loaf pan in oven, close oven door, and allow dough to rise for 45 minutes.
  6. Remove bowl from oven and gently press down on center of dough to deflate. Repeat folding step (making total of 8 folds), re-cover, and return to oven until doubled in volume, about 45 minutes.
  7. Whisk filling ingredients together until well combined. Set aside. Grease a loaf pan.
  8. Transfer dough to lightly floured surface. Pat into a 6 x 11 inch rectangle. With short side facing you, fold long sides in like a business letter to form a 3 x 11 inch rectangle. Roll dough away from you into a ball. Dust with flour and flatten with rolling pin into 7 x 18 inch rectangle with 1/4 inch thickness.
  9. Using a spray bottle, spray dough lightly with water. Sprinkle half of filling mixture evenly over dough, leaving 1/4 inch border on 18 inch sides and 3/4 inch border on 7 inch sides. Spray filling lightly with water. With short side facing you, roll dough away from you into a firm cylinder. Turn loaf seam side up and pinch closed, then pinch ends closed. Dust loaf lightly on all side with flour and let rest for 10 minutes.
  10. Cut loaf in half lengthwise and turn halves so cut sides are facing up. Gently stretch each half into 14 inch length. Line up pieces of dough and pinch 2 ends of strips together. Take the piece on the left and lay over the piece on the right. Repeat, keeping cut side up, until pieces of dough are tightly twisted. Pinch ends together.
  11. Transfer loaf, cut side up, to prepared loaf pan; pushing any exposed raising into the seams. Cover loosely with plastic, return to oven, and allow to rise for 45 minutes.
  12. Remove loaf and water pan from oven. Heat oven to 350 degrees. Allow to rise at room temperature until almost doubled in size, about 45 minutes longer. The top of the loaf should rise about 1 inch over lip of pan.
  13. Brush loaf with egg mixture. Bake until crust is well browned, about 25 minutes. Reduce oven temperature to 325 degrees, tent loaf with aluminum foil, and continue to bake about 20 minutes more (until internal temperature reaches 200 degrees).
  14. Transfer pan to wire rack and let cool for 5 minutes. Remove loaf from pan, return to rack, and cool to room temperature before slicing, about 2 hours.

April 02, 2014

Chicken Liver Pate

No comments:
Yum
The onion could be doubled, increasing the deliciousness. Otherwise, keep as is.


Chicken Liver Pate

Ingredients
  • 1 lb chicken livers, cleaned
  • 1/2-1 stick cold, unsalted butter, cut into pieces
  • 1 onion, chopped
  • 4 garlic cloves, minced
  • 2 tablespoons capers
  • 2 bay leaves
  • 1/2 teaspoon dried thyme
  • 1/2 teaspoon salt
  • 1/2 teaspoon pepper
  • 1/4 cup whiskey, cognac, or brandy
Cooking Directions
  1. In a large pan, melt 1/2 stick of the butter over medium-high heat. Add the onions and cook, stirring, until soft, about 3 minutes. Add the garlic and cook for about 30 seconds. Add the chicken livers, 1 tablespoon of capers, the bay leaves, thyme, salt, and pepper, and cook, stirring, until the livers are browned on the outside and still slightly pink on the inside, about 5 minutes.
  2. Add the whiskey and cook until most of the liquid is evaporated and the livers are cooked but still tender.
  3. Remove from the heat and let cool slightly. Take out the bay leaves.
  4. In a food processor, puree the liver mixture. If desired, add the remaining butter in pieces and blend. Add the other 1 tablespoon of capers. Adjust the seasoning to taste.
  5. Pack the pate into a bowl. Cover with plastic and refrigerate until firm, at least 6 hours.

March 19, 2014

Osso Buco with Beef

No comments:
Yum

Osso Buco is a classic Italian dish that usually uses veal shanks. We wanted to see if we could create the same flavors but with a less expensive meat. Blade steaks were used because they're comparatively inexpensive and are a tough cut. Tough cuts like veal shanks and blade steaks are perfect for braising, which is exactly how osso buco is cooked. By the end, the meat became tender and fell apart easily and soaked up much of the flavor of the braising liquid. It was extremely easy, and I would make it again as-is any time. Enjoy!


Osso Buco with Beef

Yield: 4 servings
Ingredients
  • 1.5 pounds blade steak
  • 2 tablespoons canola oil
  • 1 onion, chopped
  • 2 carrots, peeled and chopped
  • 6 garlic cloves, crushed and diced
  • 15 oz can diced tomatoes
  • 1/2 cup dry white wine
  • 1 cup broth
  • 1 bay leaf
  • 1/2 teaspoon dried thyme
  • salt and pepper to taste
Cooking Directions
  1. Trim and season the blade steaks with salt and pepper.
  2. Preheat oven to 300 F.
  3. Heat skillet or dutch oven on medium-high heat. Add 1 tablespoon of oil.
  4. Drop the steaks in pan and sear it thoroughly, using a pair of tongs to turn it. When a nice brown crust has developed on all sides of the meat, remove it from the pan to a bowl.
  5. Pour in most of the wine and scrape the pan to remove the browned bits. Remove to the bowl with the steaks.
  6. Add the carrots and onions and cook for 5 minutes or so, or until the onion is slightly translucent. Add the garlic and after 30 seconds, add the rest of the wine and scrape the pan again.
  7. Add the remaining ingredients and mix. Add the steaks and juice from the bowl. The liquid should cover 3/4 of the steaks.
  8. Cover and put in oven at 300 F.
  9. After 40 minutes, flip the steaks and cook uncovered for another 40 minutes.
  10. Replace cover, reduce heat to 250 F, and cook for 1 hour.
  11. Serve with polenta, rice, or risotto. Serve with gremolata if desired.

March 05, 2014

Sourdough Waffles

No comments:
Yum
The lightest, crispiest waffles you may ever make at home. Slightly tangy from the sourdough and perfect for a lazy weekend morning. Enjoy!


Sourdough Waffles

Yield: 6 Belgian waffles
Ingredients
  • 1 cup sourdough starter
  • 450g warm water
  • 325g all-purpose flour
  • 1 egg
  • 2 tablespoons canola oil
  • optional: 1/4 cup milk
  • 1/2 teaspoon salt
  • 1 teaspoon baking soda
  • optional: 2 tablespoons sugar
Cooking Directions
  1. The night before you want waffles, mix the sourdough starter with the warm water. Then mix in the flour. Some lumps are fine and will even out overnight. Let sit covered in a warm place for about 12 hours.
  2. In the morning, remove one cup of the batter and set aside. This is your starter now. Save it for next time.
  3. Mix in an egg, oil, and milk, if using, into the batter.
  4. In a separate small bowl, combine the salt, baking soda, and sugar, if using.
  5. Heat your waffle iron to the second-highest setting highest setting.
  6. Once preheated, sprinkle the salt/soda mixture over the batter. Fold (don't mix) to incorporate.
  7. Cook according to waffle iron manufacturer's instructions.

February 19, 2014

Sandwich Bread from Sourdough Starter

No comments:
Yum
Sandwich bread can be made with a sourdough starter. The result is a bread with a softer texture, stronger crumb, and a slightly tangy taste. The sour taste can be changed depending on how long the dough ferments and the amount of sugar used. Either way, you'll get a beautiful loaf that is easy and healthier than almost anything you'll find in the stores.

Check below the recipe on how to make your sourdough leaven. Enjoy!


Sandwich Bread from Sourdough Starter

Yield: 2 loaves
Ingredients
  • 2 cups sourdough leaven
  • 256 g all-purpose flour
  • 400 g whole wheat flour
  • 398 g warm water
  • 4 tablespoons canola oil
  • 1 teaspoon salt
  • 80 g brown sugar, optional
Cooking Directions
  1. In a stand mixer with the mixing paddle, mix the sourdough leaven with the water, oil, salt, and brown sugar, if using.
  2. Mix in the flour with the same attachment.
  3. Let sit 12-36 hours. The longer the fermentation time, the stronger the sourdough flavor. I recommend 24 hours at first, then adjust from there next time.
  4. Over the 12-36 hours, fold and turn dough over itself 2 to 4 times.
  5. About an hour before baking, split into two lightly greased loaf pans. Allow to double in size. Score if you like.
  6. Bake at 350 F for 60 minutes.
  7. Let rest 5 minutes in the pans before removing to a wire rack. Allow to cool completely.

2 cups sourdough leaven:

4 tbs sourdough starter
202 g warm water
144 g all-purpose flour

Mix together (but leave some lumps). Let sit overnight to 24 hours. Put 4 tbs back with the other starter in the morning.

February 05, 2014

Fluffy Soft Dinner Rolls

No comments:
Yum
Deliciously soft and fluffy dinner rolls. Very easy, and what little effort there is is totally worth it. They're also small enough so that you don't need to feel guilty at all about them. Enjoy!

Fluffy Soft Dinner Rolls

Yield: 24-30 rolls
Ingredients
  • 1 package active dry yeast
  • 1 cup warm water
  • 1/2 cup sugar
  • 1 egg, beaten
  • 2 teaspoons salt
  • 1 cup milk, scalded but cooled to warm
  • 6 ounces butter, melted
  • 5 cups all-purpose flour
Cooking Directions
  1. In a standing mixing bowl with dough hook, dissolve yeast in warm water. Let sit until lightly foamy, then stir in sugar.
  2. Mix in egg, salt, warm milk, and 4 ounces of melted butter.
  3. Slowly add 5 cups flour, adding more as needed to make an elastic dough. Knead for 5 minutes.
  4. Place dough in buttered bowl, cover with towel, and set in a warm place to rise until double in bulk, about 1 hour.
  5. Lightly oil a muffin pan. Punch down dough and form dough into 1-inch balls. Place 3 balls in each muffin tin. Fill muffin pan, cover with towel, and allow to rise an additional 1/2 hour.
  6. Preheat oven to 425 degrees F.
  7. Brush with the remaining melted butter. Bake for 10 to 15 minutes, until golden brown.

January 22, 2014

Homemade Mushroom Stuffing

No comments:
Yum
If you ever wanted to make your own stuffing (or dressing) instead of buying that boxed stuff, this is as easy as it gets. Enjoy!


Homemade Mushroom Stuffing

Yield: 10 servings
Ingredients
  • 4 tablespoons butter
  • 1 onion, chopped
  • 3 celery stalks, sliced
  • 1/2 pound mushrooms, sliced
  • 1/2 teaspoon kosher salt
  • 1 teaspoon dried thyme
  • 10 cups dried breads cubes (1 inch)
  • 1 cup water or broth
  • 1 teaspoon dried parsley
Cooking Directions
  1. Melt butter in a large pan. Saute onions and celery on medium heat until onions are translucent.
  2. Add mushrooms, salt, and thyme for 5 minutes.
  3. Turn off heat. Add bread cubes and gently stir them into the mushroom mixture.
  4. Slowly pour water or broth over the bread cubes folding everything carefully so the bread cubes do not break apart too much.
  5. Preheat oven to 350 degrees F.
  6. Scoop stuffing into a medium casserole dish and bake uncovered for 40 minutes or until nice and toasty on top.

January 13, 2014

Homemade Tempeh

No comments:
Yum
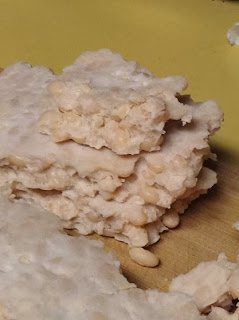
It is incredibly easy to make your own tempeh at home. There are dozens of sites out there that will show you how, with this being the most basic and least expensive way. You will have to order some tempeh starter for yourself, however. That said, you can use any kind of bean you want! The real trick is keeping it incubated at the right temperature, but it's not that difficult. Enjoy!


Homemade Tempeh

Yield: 10 servings
Ingredients
  • 1 lb beans
  • 1.5 tablespoons white vinegar
  • 1 teaspoon tempeh starter
Cooking Directions
  1. Soak beans overnight (or for 8-12 hours).
  2. Cook them until soft but still firm (slightly under done).
  3. Strain liquid and let cool. Make sure the beans are dry. If necessary, heat in a pot on the stove, stirring constantly. Then let it cool.
  4. Mash beans or place in food processor, leaving some whole beans remaining.
  5. Add vinegar and mix.
  6. Add tempeh starter and mix thoroughly.
  7. Place into a baking dish or plastic bag with holes poked in it.
  8. Spread evenly and pack it down tight.
  9. Place a piece of aluminum foil on top of dish, if using. Poke a number of fork holes in the foil.
  10. Find a place to incubate for 24 hours, between 85-90 degrees. I place mine in the oven, occasionally turning on the heat for a few seconds. This can also take up to 48 hours.
To cook the tempeh, either steam it then marinate and saute or just saute. If the tempeh is particularly dry, steam it for 5 to 15 minutes first, to desired softness. The marinade recipe is below. Let marinate for at least 15 minutes.

1/5th of the batch of tempeh
2 tablespoons oil, either canola, sesame, or a mix
2 tablespoons soy sauce
1 tablespoon lemon juice or 1/2 tablespoon vinegar
2 cloves garlic, diced
optional: 2 tablespoons fresh ginger, diced