Showing posts with label vinegar. Show all posts

April 17, 2015

Stuffed Roast Pork Loin

No comments:
Yum
This one's a little tricky and takes a little time, yet the roast that emerges is savory with a not-too-sweet stuffing. It's huge and well worth it. It also works extremely well without the stuffing. The brine is just that delicious. Enjoy!

Stuffed Roast Pork Loin

Yield: 8-10 servings
Ingredients
  • 2 quarts pork brine
  • 2.5 pound pork loin roast
  • 1/2 cup fennel, cut into 1 1/2 by 1/2 inch pieces
  • canola oil
  • 1 teaspoon garlic, minced
  • 1 tablespoon onion, chopped
  • 1 cup fig and balsamic jam
  • 1/4 cup stock
  • 1/4 teaspoon dried thyme
  • kosher salt and fresh black pepper
  • Pork Brine
  • 1/4 cup honey
  • 12 bay leaves
  • 3 tablespoons rosemary
  • 1/4 teaspoon dried thyme
  • 1 teaspoon dried parsley
  • 1/2 cup garlic cloves, crushed, skin on
  • 2 tablespoons black peppercorns
  • 1 cup kosher salt
  • 8 cups water
  • Fig and Balsamic Jam
  • 0.8 pounds figs, preferably Black Mission or Kadota, stems removed and coarsely chopped
  • 1/2 cup sugar
  • 1/4 cup balsamic vinegar
  • 1/2 teaspoon black peppercorns, tied in a sachet
  • lemon juice
Cooking Directions
    Pork Brine
  1. Combine all ingredients in a large pot and bring to a boil. Boil for 1 minute, stirring to dissolve salt. Remove from heat and cool completely, then chill before using.
  2. Fig and Balsamic Jam
  3. Combine figs, sugar, balsamic vinegar, and sachet in a large saucepan. Bring to a simmer over medium-high heat, then lower to maintain a gentle simmer. Cook, stirring to break up large chunks of fig, until the jam reaches 215 F to 220 F. Remove from heat and remove the sachet. Add lemon juice to taste. Let cool to room temperature.
  4. Pork Roast
  5. Pour the brine into a large container and add the pork. Refrigerate for 10 hours but no longer.
  6. Remove pork and rinse. Pat dry or let air dry. Discard brine.
  7. With a long knife, make a horizontal lengthwise cut all the way through the center of the loin. Work from both ends. Then make a vertical cut to form a cross.
  8. Set a rack over a baking sheet and line with paper towels.
  9. Heat a small amount of canola oil in a medium pan over medium heat, cook fennel for 2-3 minutes until just tender. Add garlic and shallot and cook for 1 minute. Stir in the jam until warm, then add stock, thyme, and salt and pepper to taste. Stir until combined. Transfer to a bowl and let it cool completely.
  10. Preheat the oven to 350 F. Put a roasting rack in a roasting pan and put it in the oven.
  11. Meanwhile, use your fingers to widen the cavity in the meat. Stuff the pork loin from both ends all the way to the center. Tie the loin with kitchen twine.
  12. Season the loin with salt and pepper all over. Heat some more canola oil in a large pan over medium-high heat until smoking. Brown the loin on all sides, 2-3 minutes per side.
  13. Transfer the pork to the roasting pan and roast for 30-40 minutes, or until the pork is 135 F to 140 F. Remove from the oven and let it rest in a warm spot for 30 minutes.
  14. Remove the string and cut into 1/4 inch slices. Plate and sprinkle with coarse salt.

March 06, 2015

Roast asparagus salad with baked goat cheese

No comments:
Yum
This is a wonderful, fresh, and flavorful salad. Rich but not too rich. The asparagus gets tender, the dressing is outstanding, and the goat cheese is crispy yet smooth. Serve it as a starter or just as a light meal. Enjoy!


Roast asparagus salad with baked goat cheese

Yield: 4 servings
Ingredients
  • 1/4 cup olive oil
  • 1/4 cup shallot, minced
  • 2 tablespoons balsamic vinegar
  • 1 teaspoon Dijon mustard
  • 4 cups frisee
  • salt and pepper
  • 2 pounds asparagus
  • olive oil
  • kosher salt
  • black pepper
  • 1 cup flour
  • 1 egg, beaten
  • 1 cup milk
  • 2 cups panko breadcrumbs
  • 4 slices goat cheese (3/4 inch slices)
Cooking Directions
  1. Place the shallot and olive oil in a skillet and cook for 2 minutes over medium heat.
  2. Add the vinegar, mustard, salt, pepper, and stir well to incorporate. Set aside and cool to room temperature.
  3. Preheat the oven to 375 F.
  4. Break off the tough ends of the asparagus, and, if they're thick, peel them.
  5. Place the asparagus on a baking sheet, drizzle with olive oil, then toss to coat the asparagus completely. Spread the asparagus in a single layer and sprinkle liberally with salt and pepper.
  6. Roast the asparagus until tender but still crisp.
  7. Meanwhile, put the flour in one bowl, mix the egg and milk in one bowl, and put he breadcrumbs in one bowl.
  8. Dip the cheese slices into the flour, then the egg-milk wash, and then into the breadcrumbs, alternating your hands.
  9. Refrigerate until ready to use.
  10. When ready to use, turn the oven broiler to low. Place the goat cheese discs onto an oiled pan and place under the broiler on high. Broil until brown.
  11. Toss the frisee in the dressing until well-coated, then season with salt and pepper.
  12. Plate, and top each salad with a goat cheese disk and asparagus spears. Finish with extra salt and pepper.

December 03, 2014

New York Street Cart Chicken and Rice

No comments:
Yum
If you've ever had the chicken and rice from the Halal Guys in New York (or just about any of the other carts), you've likely dreamed about making it at home too. Here's a recipe for that deliciousness that closely hits the mark. Enjoy!


New York Street Cart Chicken and Rice

Yield: 6-8 servings
Ingredients
    For the chicken:
  • 2 tablespoons lemon juice
  • 1 tablespoon dried oregano
  • 1/2 teaspoon ground coriander
  • 3 garlic cloves, chopped
  • 1/8-1/4 cup olive oil
  • salt and pepper
  • 2 pounds boneless, skinless chicken thighs, trimmed of fat
  • 1 tablespoon canola oil
  • For the rice:
  • 2 cups rice, uncooked
  • 1/2 teaspoon turmeric
  • 1/4 teaspoon ground cumin
  • water
  • salt and pepper
  • For the white sauce:
  • 1/2 cup plain yogurt
  • 1 tablespoon vinegar
  • 1 teaspoon lemon juice
  • 1/4 cup fresh parsley
  • salt and pepper
  • To serve:
  • 1 lettuce, shredded
  • 1 tomato, cut into wedges
Cooking Directions
  1. For the chicken: Combine the lemon juice, oregano, coriander, garlic, and olive oil in a ziploc bag. Season the marinade to taste with kosher salt and black pepper. Place the chicken in the bag. Turn the chicken to coat, seal the bag, and marinate the chicken in the refrigerator for 1 to 4 hours, turning occasionally to redistribute the marinade.
  2. Remove the chicken from the bag. Season with kosher salt and a lot of pepper. Heat the canola oil in a large skillet over medium-high heat until it is lightly smoking. Add the chicken pieces and cook without disturbing until they are lightly browned on the first side, about 4 minutes. Flip the chicken and reduce the heat to medium. Cook until the chicken is cooked through, about 6 minutes longer. Transfer the chicken to a cutting board and allow to cool for 5 minutes.
  3. Roughly chop the chicken into 1/2- to 1/4-inch chunks. Transfer to a medium bowl, add the marinade, cover, and refrigerate while you cook the rice and prepare the sauce.
  4. For the rice: Put rice in rice cooker. Add the turmeric and cumin. Add water to the suggested amount for 2 cups. Season with salt and pepper. Cook as normal.
  5. For the white sauce: In a small bowl, combine the yogurt, vinegar, lemon juice, parsley, and 2 teaspoons black pepper. Season to taste with salt.
  6. To serve: Return the entire contents of the chicken bowl to the skillet. Cook over medium-high heat, stirring occasionally, until heated through. Pile the chicken on top of the rice and lettuce. Top with the white sauce. Serve immediately.

September 24, 2014

Chinese Chicken Salad

No comments:
Yum
Here is a recipe passed down from grandma to ma to my wife. She loves to make this. It's like a nostalgic reminder of her childhood, especially the holidays. Personally, I could do without the maifun, so if you don't want it, try it without.

This recipe also walks you through cooking and shredding the chicken, but if you already have some on hand or prefer another method, I'd love to hear it! Enjoy!


Chinese Chicken Salad

Yield: 8+ servings
Ingredients
  • 2 lbs chicken breasts
  • 1 tablespoon canola oil
  • 3/4 cup water
  • salt and pepper
  • 1 head iceberg lettuce, chopped and sliced
  • 1 package maifun
  • oil for deep frying
  • 3 green onions, only the green parts, sliced
  • 1/8 cup toasted almonds
  • 1/16 cup toasted sesame seeds
  • 4 tablespoons sugar
  • 3 teaspoons salt
  • 1/2 teaspoon black pepper
  • 4 tablespoons white vinegar
  • 1/4 cup canola oil
Cooking Directions
  1. Pat the chicken breasts dry and season with some salt and pepper. In a large skillet, heat the 1 tablespoon of canola oil, and cook the chicken breasts top-side down until browned, about 5 minutes. Flip the breasts and add the water and additional salt to the water. Cover and simmer on low for 7-10 minutes, until cooked. Let cool slightly (at least 15 minutes) before shredding.
  2. Deep fry the maifun in batches until all are puffed up. Set aside on plates with paper towels.
  3. For the dressing, mix together the last 5 ingredients.
  4. When ready to serve, mix the chicken and lettuce together. Then add in the maifun, then the green onions, almonds, and sesame seeds. Finally, mix in the dressing.

January 13, 2014

Homemade Tempeh

No comments:
Yum
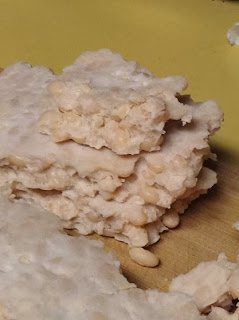
It is incredibly easy to make your own tempeh at home. There are dozens of sites out there that will show you how, with this being the most basic and least expensive way. You will have to order some tempeh starter for yourself, however. That said, you can use any kind of bean you want! The real trick is keeping it incubated at the right temperature, but it's not that difficult. Enjoy!


Homemade Tempeh

Yield: 10 servings
Ingredients
  • 1 lb beans
  • 1.5 tablespoons white vinegar
  • 1 teaspoon tempeh starter
Cooking Directions
  1. Soak beans overnight (or for 8-12 hours).
  2. Cook them until soft but still firm (slightly under done).
  3. Strain liquid and let cool. Make sure the beans are dry. If necessary, heat in a pot on the stove, stirring constantly. Then let it cool.
  4. Mash beans or place in food processor, leaving some whole beans remaining.
  5. Add vinegar and mix.
  6. Add tempeh starter and mix thoroughly.
  7. Place into a baking dish or plastic bag with holes poked in it.
  8. Spread evenly and pack it down tight.
  9. Place a piece of aluminum foil on top of dish, if using. Poke a number of fork holes in the foil.
  10. Find a place to incubate for 24 hours, between 85-90 degrees. I place mine in the oven, occasionally turning on the heat for a few seconds. This can also take up to 48 hours.
To cook the tempeh, either steam it then marinate and saute or just saute. If the tempeh is particularly dry, steam it for 5 to 15 minutes first, to desired softness. The marinade recipe is below. Let marinate for at least 15 minutes.

1/5th of the batch of tempeh
2 tablespoons oil, either canola, sesame, or a mix
2 tablespoons soy sauce
1 tablespoon lemon juice or 1/2 tablespoon vinegar
2 cloves garlic, diced
optional: 2 tablespoons fresh ginger, diced

December 18, 2013

Pickled Green Tomatoes

No comments:
Yum
They taste like pickles!


Pickled Green Tomatoes

Yield: 1 quart jar
Ingredients
  • 1 cup white vinegar
  • 1 1/4 cup water
  • 3 tablespoons kosher salt
  • 1 pound firm green tomatoes
  • 1/2 teaspoon red pepper flakes
  • 6 garlic cloves, sliced in half
  • 2 tablespoons pickling spices
  • 1/4 tablespoon whole black pepper
Cooking Directions
  1. Sterilize the jar by submerging them in a boiling water bath.
  2. Add the garlic, dill seeds, and peppercorns to the jar.
  3. Thoroughly wash the tomatoes and slice them in quarters. Cut out all bad spots and the stem ends. Cram them in the jar leaving about 1/2" to 3/4" of space at the top.
  4. Make the brine by combining the vinegar, water, and salt in a non-reactive sauce pan or pot. Bring to a boil, and stir until all the salt is dissolved.
  5. Pour the hot brine over the tomatoes to within 1/4" of the top. Wipe the jar top, put the lids on and tighten. Age for at least 1 week in the refrigerator.
Recipe adapted from Meathead at AmazingRibs.com

October 23, 2013

Homemade Kimchi

No comments:
Yum

Kimchi is kind of a rage. It's pretty much in everything with any kind of fusion. It's also damn awesome on its own. So instead of buying expensive kimchi in the store, make your own on the cheap. It takes no time at all, and you can adjust the heat level later if you like. Everyone's kimchi is different, so experiment until you get it right. Then add it to some fried rice. Enjoy!


Kimchi

Yield: 1 large jar of kimchi
Ingredients
  • 1 large napa cabbage (about 2 pounds)
  • 2 tablespoons coarse salt
  • 50 ml fish sauce
  • 30 ml vinegar (white or rice)
  • 80 ml (1/3 cup) chili paste (or chili sauce and/or sriracha)
  • 1 tablespoon garlic, minced
  • 1 tablespoon ginger, minced
  • 4 green onions, cut into 1 inch pieces
Cooking Directions
  1. Remove the tough outer leaves of the cabbage and slice it lengthwise in half. Remove the core.
  2. Cut the cabbage into 1-2-inch pieces. Toss the cabbage with the salt in a large bowl, then transfer it to a colander set over a bowl. Set a plate on top then weigh it down with something heavy for 24 hours.
  3. After 24 hours, mix together the remaining ingredients in a large bowl.
  4. Add the cabbage in handfuls to the marinade, taking small bunches at the time and squeezing them of any excess water before adding them to the marinade. Mix the cabbage with the marinade.
  5. Pack into a jar, cover tightly, and let stand at room temperature 48 hours. Then chill for 4 days before serving.
This will keep for a long time, but it could be very fermented after 3 weeks.

February 13, 2012

Carne Asada

2 comments:
Yum


Ingredients

3 pounds flank steak
1/3 cup white vinegar
1/2 cup soy sauce
4 cloves garlic, minced
2 limes, juiced
1/2 cup olive oil
1 teaspoon salt
1 teaspoon ground black pepper
1 teaspoon ground white pepper
1 teaspoon garlic powder
1 teaspoon chili powder
1 teaspoon dried oregano
1 teaspoon ground cumin
1 teaspoon paprika
1 white onion, chopped
1/2 cup chopped fresh cilantro

1 lime, juiced
2 large tomatoes, chopped
2 jalapeno peppers, chopped
1 white onion, quartered
4 cloves garlic, peeled
4 dried New Mexico chile pods
1 pinch salt and pepper to taste

Directions

1. Lay the flank steak in a large plastic bag. In a medium bowl, whisk together the vinegar, soy sauce, 4 cloves of garlic, juice of two limes, and olive oil. Season with salt, black pepper, white pepper, garlic powder, chili powder, oregano, cumin and paprika. Whisk until well blended, then pour over the steak in the dish. Turn over once to coat both sides. Cover with plastic wrap, and marinate for up to 8 hours.

2. In a small bowl, stir together 1 chopped white onion, cilantro, and the juice of 1 lime. Set aside to use as a relish for the burrito.

3. Heat a skillet over medium-high heat. Toast chile pods in the skillet for a few minutes, then remove to a bowl of water to soak for about 30 minutes. Preheat the oven to 450 degrees F (230 degrees C).

4. Place the tomatoes, 1 onion, jalapenos, and 4 cloves of garlic onto a baking sheet. Roast in the oven for about 20 minutes, until toasted but not burnt. Place the roasted vegetables, and soaked chile pods into a blender or food processor, along with salt and pepper. Puree until smooth.

5. Heat vegetable oil in a large skillet over medium-high heat. Cut the marinated flank steak into cubes or strips. Cook, stirring constantly, until the meat is cooked through and most of the liquid has evaporated.

6. Warm the tortillas in a skillet for about a minute on each side to make them pliable. Tortillas may also be warmed in a microwave oven. Arrange tortillas on plates, and lay a generous amount of beef over them. Top with a sprinkle of the onion relish and a large spoonful of the pureed salsa. Garnish with lime wedges, and serve.

August 25, 2011

Vietnamese Pickled Vegetables

No comments:
Yum

You ever have one of those awesome Vietnamese sandwiches called bahn mi? You know those delicious veggies that are in them? Well now you can make them yourself! Crunchy, salty, sweet: the perfect topping or addition to any Vietnamese dish (goes great with fish sauce!). Enjoy!

Ingredients

1/2 lb. carrots, sliced in thin rounds or thin match-like strips
1/2 lb. daikon radish (or any radish), cut same as carrots
3 cups warm water
3 Tablespoons distilled or rice vinegar
2 tablespoons sugar
2 tablespoons salt

Directions

1. Mix warm water, vinegar, sugar, and salt until everything is dissolved.

2. Combine carrots and radish together in a jar.

3. Pour brine mixture into jar. Close lid and let it pickle for about 3-5 days or till desired sourness. For immediate use, let marinade for about 1 hour.

August 20, 2011

Pickled Onions

No comments:
Yum

You need to make these. If you've never had them in some awesome Latin American (or any other) cooking, you've been missing out. You'll soon be putting these on just about every darn thing you make. Burger, pizza, tacos, you name it. Enjoy!

August 10, 2011

Pickled Ginger

No comments:
Yum

Beautifully crunchy, sweet, and spicy. This pickled ginger will have you wondering why you ever bought the pre-made stuff ever again. What's even better is that ginger is great for digestion. Enjoy!

July 25, 2011

Butter Thyme Fish with Collard Greens +

No comments:
Yum

The very lightest hint of butter with the addition of fresh thyme melt this fish to perfection. We used wild pollock but any white fish will do.


Plus the side of collard greens (semi-southern style) proves a winning combination for a healthy and happy dinner. Fish, greens, and rice - mmm mmm. Enjoy!

May 31, 2011

Disneyland's Tonkatsu Sauce (Chicken Marinade)

No comments:
Yum
Tonkatsu Sauce (Chicken Marinade)

Bengal Barbecue

Ingredients

1 c. Teriyaki Sauce
1 c. Soy Sauce
1 T. Red Wine Vinegar
1 c. Brown Sugar
½ c. Sherry Cooking Wine
2 Whole Bay Leaves
1 T. Ground Black Pepper
3 T. Grated Fresh Ginger Root
2 T. Fresh Garlic, finely minced

Directions

Mix ingredients and marinate chicken overnight in your refrigerator.

Disneyland's Tahitian Sauce (Chicken Dip)

No comments:
Yum
Tahitian Sauce (Chicken Dip)

Bengal Barbecue

Ingredients

4 Whole Cloves
1 T. Red Wine Vinegar
1 c. Ketchup
½ c. Crushed Pineapple
½ c. Pineapple Juice
½ c. Brown Sugar
½ c. Soy Sauce
¼ c. Orange Juice Concentrate
3 T. Water

Directions

Simmer cloves in vinegar for 5-10 minutes. Strain cloves and add other ingredients.
Bring mixture to slow boil over medium heat.

Disneyland's Hawaiian Ginger Dressing

No comments:
Yum
Hawaiian Ginger Dressing

Tahitian Terrace

Makes 1 1/2 cups

Ingredients

7 tbsp. red wine vinegar
5 tbsp. canola oil
3 tbsp. cut up, peeled fresh ginger
1 tsp. garlic salt
8 tbsp. crushed pineapple
3 tbsp. sugar
1/8 tsp. M.S.G., if desired

Directions

In a blender, combine vinegar, oil and fresh ginger. Blend well on high speed (15 seconds).

Add salt, pineapple, sugar and M.S.G., if used. Blend for another 15 seconds.

Refrigerate any unused portion.

Disneyland's Blue Bayou Caesar Salad

No comments:
Yum
Caesar Salad

Blue Bayou, Club 33

Ingredients

1 clove garlic, finely minced
1 t. Worcestershire sauce
3 T. vinegar
1 egg, coddled (cooked in shell for 1 minute)
3/4 t. Dijon Mustard
1 head romaine lettuce, torn into 2-inch pieces
1/2 c. croutons
1/2 lemon
Parmesan cheese
Pepper, freshly ground

Directions

In a small bowl, combine garlic, Worcestershire sauce, vinegar, and egg. Add pepper to taste and mix well.

Clean lettuce and dry on paper towels. Place lettuce in a large bowl and squeeze the juice of ½ lemon over the greens; mix lightly.

Add dressing and toss lettuce, coating each piece well. Add croutons and sprinkle entire salad with Parmesan cheese. Toss again and serve immediately.

April 14, 2011

Italian 3 Bean Salad

No comments:
Yum

3 Bean Salad is delicious. A staple of picnics and potlucks, it can be a satisfying side because of the high amount of protein and fiber - it's just chock full of the stuff!


It can be quick and easy too if you're using canned beans, though I like to go a more wholesome route and do it with dried beans from scratch. There's something about the aroma of a pot of beans that I love.

So pack a picnic basket full of this and a sandwich (plus maybe a bottle of wine) for a lovely day out. Enjoy!

December 05, 2010

Crunchy Pickles

No comments:
Yum

It's pickle time again! Crunchy pickles, mmm. The best thing about these pickles is that they stay crunchy for weeks and weeks. I made these back in August and they're still crunchy here in December. A simple, delicious, awesome snack? Or only a side and topping for burgers? You decide. Enjoy!

July 07, 2010

Fast Pickled Zucchini and Peppers

2 comments:
Yum
My first pickling! I was so excited to try this out because it's fast. I always imagined pickling would take forever and a day (and I know sometimes it does), but not this time!

(the one on the right has zucchini and bell peppers, and the one on the left has just zucchini)

The turmeric really gives this a nice color. So much more fun than a clear brine. The jars sealed perfectly too. I was almost flabbergasted at how easy this was.

I didn't have any cucumber to try this on, but there were some bell peppers and zucchini that needed to get used, so voila. The day after it was sealed, the zucchini tasted great, though the peppers weren't as flavored. On the third and fourth day, the zucchini starts to take in more of the vinegar I think, so maybe eat that first. The bell peppers, on the other hand, just keep getting better.

Enjoy!

Adapted from Martha Stewart.
Fast Pickled Zucchini and Peppers

Yield: 3 1/2 cups
Ingredients
  • 2 zucchini, sliced
  • 1/2-1 bell pepper, cut into small strips
  • 3 cups white vinegar
  • 2 teaspoons coarse salt
  • 1 teaspoon celery flakes
  • 1/2 teaspoon dried onion
  • optional: 1/2 teaspoon crushed red pepper
  • 1/8 teaspoon turmeric
Cooking Directions
  1. In a medium saucepan, combine all ingredients except the prepared veggies.
  2. Bring to a boil, stirring to dissolve sugar.
  3. Arrange prepared vegetables in one or more jars.
  4. Pour hot brine into jar to completely cover vegetables and seal jar.
  5. Refrigerate until cool.