Showing posts with label oil. Show all posts

February 05, 2016

Pressure Cooker Thai Coconut Curry

1 comment:
Yum
The beauty of this recipe is that it is 1) very quick, and 2) very forgiving. What that means is that you can play around with the veggies a great deal. Want sweet potatoes instead of potatoes? Done. Want winter squash instead of that? Done. Want to throw in green beans or eggplant or mushrooms? Go or it. Just don't overload your pressure cooker, and you'll be fine. Enjoy!


Pressure Cooker Thai Coconut Curry

Yield: 6 servings
Ingredients
  • 2 tablespoons oil
  • 3 cloves garlic, crushed
  • optional: 3 Thai green chilis
  • 1/4 teaspoon ground coriander
  • 1/4 teaspoon ground cumin
  • 2 teaspoons Thai curry cowder
  • OR 2 tablespoons Thai curry paste
  • 1 14-oz can coconut milk
  • 6 cups potatoes, cubed
  • 4 carrots, sliced 1/2-inch thick
  • 1-2 lbs chicken pieces
  • Kosher salt
  • 1 tablespoon fish sauce
  • 4 oz (4 packed cups) spinach
  • 1/2 cup loosely packed fresh herbs
  • fresh black pepper
  • 1/4 - 1/2 cup cooked rice or grain
  • 6 lime wedges
Cooking Directions
  1. Heat oil in a pressure cooker over medium-high heat until shimmering. Add garlic, chilies (if using), ginger, coriander, and cumin and cook, stirring, until aromatic, about 1 minute. Add curry powder or paste and cook, stirring, until it has darkened slightly, about 2 or 3 minutes.
  2. Add coconut milk, stir, bring to a simmer, and cook for 1 minute. Sprinkle salt on chicken pieces. Add half the potatoes and carrots. Add chicken and top with the remaining potatoes and carrots. Sprinkle on a little salt. Seal pressure cooker and cook on high pressure for 20 minutes.
  3. Release pressure with the quick-release method, remove lid, and stir in the fish sauce, spinach, and 3/4 of any fresh herbs. Season with salt and pepper to taste. Ladle the stew into serving bowls and place remaining herbs on top. Serve with rice (or grain) and lime wedges.

January 01, 2016

Fresh Semolina Egg Pasta

No comments:
Yum
Fresh pasta is so easy with the right machine. By hand it can be laborious and tiresome. But with a machine roller and cutter (via KitchenAid), it is a relative breeze. Either way it takes a long time to mix the eggs into the flour though, so be prepared. Enjoy!

Fresh Semolina Egg Pasta

Yield: 16 servings
Ingredients
  • 2 cups all-purpose flour
  • 2 cups semolina flour
  • 6 eggs
  • 2 tablespoons olive oil
  • 1 pinch salt
Cooking Directions
  1. Thoroughly sift together all-purpose flour, semolina flour, and pinch of salt. On a clean surface, make a deep well in center of the flour.
  2. Crack the eggs into the well and add the olive oil.
  3. Whisk eggs very gently with a fork, gradually incorporating flour from the sides of the well. This will take a long time! When mixture becomes too thick to mix with a fork, begin kneading with your hands.
  4. Knead dough for 8 to 12 minutes, until it is smooth and supple. Dust dough and work surface with either flour as needed to keep dough from becoming sticky.
  5. Wrap dough tightly in plastic and allow it to rest at room temperature for at least 30 minutes.
  6. Roll out dough with a pasta machine or a rolling pin to desired thickness. Cut into your favorite style of noodle. Bring water to a boil in a large pot. Cook pasta until tender but not mushy, 2 to 6 minutes, based on thickness. Drain immediately and toss with your favorite sauce.

December 04, 2015

Pressure Cooker Split Pea Soup

No comments:
Yum
A delicious recipe for a vegetarian split pea soup made in a pressure cooker. Simple, quick, and effective. Just how I like it. Enjoy!


Pressure Cooker Split Pea Soup

Yield: 6-8 servings
Ingredients
  • 1 lb split peas, soaked and rinsed
  • 1 medium onion, diced
  • 1 celery, diced
  • OR 1 tablespoon dried celery leaf
  • 1 tablespoon oil
  • 2 bay leaves
  • 1 teaspoon salt
  • 6 cups water
Cooking Directions
  1. Add everything to the pressure cooker. Mix well.
  2. Close and lock the lid.
  3. Cook on high pressure for 5 minutes.
  4. Let cool via the natural release method off the burner.
  5. Open the pressure cooker, remove the bay leaves, mix, and serve.

November 20, 2015

Garlicky Roasted Butternut Squash

No comments:
Yum
This is sooo simple. And seriously delicious. The hardest part is cutting through the dang butternut squash! It's always my favorite holiday dish. Enjoy!

Garlicky Roasted Butternut Squash

Yield: 8-12 servings
Ingredients
  • 1 butternut squash, peeled and cut into 1-inch cubes
  • 1 tablespoon olive oil
  • 1 tablespoon dried parsley
  • 2 garlic cloves, minced
  • 1 teaspoon salt
  • 1/2 teaspoon pepper
Cooking Directions
  1. In a large bowl, combine the parsley, oil, garlic, salt, and pepper. Add squash and toss to coat.
  2. Transfer to an ungreased baking sheet. Bake at 350 degrees F for 45-60 minutes or until squash is just tender and browned on the bottom.

May 22, 2015

Banana Blossom Stir Fry

No comments:
Yum
A meal my wife made up on the fly (winged it, as she likes to say). Once you've gone through the long, long, long processing of the banana blossom, it's pretty easy. That info you can find here.

The banana blossom gives an almost coconut-like taste to the dish. It's texture is reminiscent of green onions, perhaps. Not hard, slightly crunchy. Plus, it's just fun to try a new ingredient! Enjoy!


Banana Blossom Stir Fry

Yield: 4 servings
Ingredients
  • 1 banana blossom, prepared
  • 2 tablespoons canola oil
  • 1 onion, chopped
  • 1 carrot, peeled and chopped
  • 1/4 teaspoon turmeric
  • 2 eggs
  • 4 garlic cloves, minced
  • 1 cup cooked rice, dry
Cooking Directions
  1. Boil the prepped banana blossom for a minute. Drain.
  2. Heat the canola oil, stir fry the onion and carrot, then the banana blossom a few minutes later. Add turmeric.
  3. Add the cooked rice until heated through. Add whatever sauces and seasonings you like. Set entire mixture aside.
  4. Scramble the eggs, add the garlic, then add the rice mixture back to the pan. Stir well and enjoy.

May 01, 2015

Sourdough Pizza

No comments:
Yum
Here is our sourdough take on our classic Thin Crust Pizza on a pizza steel. If you like a little bit of that sourdough favor (but not a full-blown San Francisco punch), you're going to be into this. It's a little different and good in its own way. Let us know how it turned out for you. Enjoy!


Thin Crust Pizza on Steel

Yield: 3 pizzas
Ingredients
  • 205 g lukewarm water
  • 1 cup (183 g) sourdough starter
  • 1/2 tablespoon kosher salt
  • 1/8 cup olive oil
  • 345 g all-purpose flour
Cooking Directions
  1. Mix the starter, salt, and olive oil with the water in a non-airtight lidded container.
  2. Mix in the flour without kneading, using a spoon.
  3. Cover and allow to rest at room temperature until dough rises and flattens. This could take longer because of the sourdough.
  4. At this point, you can store it in the fridge for up to a week or dust the top with flour and cut into three pieces. The other pieces may be wrapped tightly with plastic wrap and stored in the freezer for several months.
  5. Preheat oven to its highest temperature and place baking steel or stone on the middle or lowest rack. Let preheat for 20-40 minutes.
  6. Shape dough into a ball by stretching the surface around to the bottom on all four sides. Do this minimally.
  7. Flatten with your hands on a well-floured surface. Get the dough to 1/8 inch thick. Use a floured rolling pin if needed. The dough will spring back some, so you may need to stretch it further than you think of stretch it again. Once stretched and relaxed, place onto a cornmeal-covered pizza peel.
  8. Place your toppings on the dough. Be minimalistic.
  9. Slide the pizza directly onto the steel or stone. Pizza may be done in as little as 4 minutes, so check to make sure it's not overcooking.
  10. Allow to cool for a minute on a rack to allow the cheese to set.

April 17, 2015

Stuffed Roast Pork Loin

No comments:
Yum
This one's a little tricky and takes a little time, yet the roast that emerges is savory with a not-too-sweet stuffing. It's huge and well worth it. It also works extremely well without the stuffing. The brine is just that delicious. Enjoy!

Stuffed Roast Pork Loin

Yield: 8-10 servings
Ingredients
  • 2 quarts pork brine
  • 2.5 pound pork loin roast
  • 1/2 cup fennel, cut into 1 1/2 by 1/2 inch pieces
  • canola oil
  • 1 teaspoon garlic, minced
  • 1 tablespoon onion, chopped
  • 1 cup fig and balsamic jam
  • 1/4 cup stock
  • 1/4 teaspoon dried thyme
  • kosher salt and fresh black pepper
  • Pork Brine
  • 1/4 cup honey
  • 12 bay leaves
  • 3 tablespoons rosemary
  • 1/4 teaspoon dried thyme
  • 1 teaspoon dried parsley
  • 1/2 cup garlic cloves, crushed, skin on
  • 2 tablespoons black peppercorns
  • 1 cup kosher salt
  • 8 cups water
  • Fig and Balsamic Jam
  • 0.8 pounds figs, preferably Black Mission or Kadota, stems removed and coarsely chopped
  • 1/2 cup sugar
  • 1/4 cup balsamic vinegar
  • 1/2 teaspoon black peppercorns, tied in a sachet
  • lemon juice
Cooking Directions
    Pork Brine
  1. Combine all ingredients in a large pot and bring to a boil. Boil for 1 minute, stirring to dissolve salt. Remove from heat and cool completely, then chill before using.
  2. Fig and Balsamic Jam
  3. Combine figs, sugar, balsamic vinegar, and sachet in a large saucepan. Bring to a simmer over medium-high heat, then lower to maintain a gentle simmer. Cook, stirring to break up large chunks of fig, until the jam reaches 215 F to 220 F. Remove from heat and remove the sachet. Add lemon juice to taste. Let cool to room temperature.
  4. Pork Roast
  5. Pour the brine into a large container and add the pork. Refrigerate for 10 hours but no longer.
  6. Remove pork and rinse. Pat dry or let air dry. Discard brine.
  7. With a long knife, make a horizontal lengthwise cut all the way through the center of the loin. Work from both ends. Then make a vertical cut to form a cross.
  8. Set a rack over a baking sheet and line with paper towels.
  9. Heat a small amount of canola oil in a medium pan over medium heat, cook fennel for 2-3 minutes until just tender. Add garlic and shallot and cook for 1 minute. Stir in the jam until warm, then add stock, thyme, and salt and pepper to taste. Stir until combined. Transfer to a bowl and let it cool completely.
  10. Preheat the oven to 350 F. Put a roasting rack in a roasting pan and put it in the oven.
  11. Meanwhile, use your fingers to widen the cavity in the meat. Stuff the pork loin from both ends all the way to the center. Tie the loin with kitchen twine.
  12. Season the loin with salt and pepper all over. Heat some more canola oil in a large pan over medium-high heat until smoking. Brown the loin on all sides, 2-3 minutes per side.
  13. Transfer the pork to the roasting pan and roast for 30-40 minutes, or until the pork is 135 F to 140 F. Remove from the oven and let it rest in a warm spot for 30 minutes.
  14. Remove the string and cut into 1/4 inch slices. Plate and sprinkle with coarse salt.

March 13, 2015

Red wine braised short ribs

No comments:
Yum
This is such a powerful yet simple dish. The braising really tenderizes and brings out the flavor of the short ribs, like it does to so many other delicious dishes (e.g. Osso Buco). Serve this on its own, with potatoes, polenta, or, as pictured, risotto. Enjoy!

Red wine braised short ribs

Yield: 1 piece per serving
Ingredients
  • 3 pounds boneless beef short ribs
  • seasoned flour
  • 4 tablespoons olive oil
  • 2 onions, diced
  • 4 carrots, diced
  • 2 celery ribs, diced
  • 8 garlic cloves, minced
  • 1 cup red wine
  • 1 14 oz. can plum tomatoes, broken up
  • 2 cups chicken stock
  • 1 tablespoon fresh oregano, chopped
  • 2 teaspoons dried herbs de Provence
  • salt and pepper
Cooking Directions
  1. Preheat the oven to 400 F.
  2. Coat the shortribs with seasoned flour and brown in the oil.
  3. Remove from the pan and add the onion, celery, mushrooms, garlic, and carrots.
  4. Sauté another 5 minutes, add the wine, and reduce by half.
  5. Add the tomatoes, stock, and herbs. Cover and braise covered in the oven for 1 hour at 400 degrees then reduce the heat to 350 F, uncover, and continue cooking for another hour or until tender.
  6. Season with salt and pepper to taste.

March 06, 2015

Roast asparagus salad with baked goat cheese

No comments:
Yum
This is a wonderful, fresh, and flavorful salad. Rich but not too rich. The asparagus gets tender, the dressing is outstanding, and the goat cheese is crispy yet smooth. Serve it as a starter or just as a light meal. Enjoy!


Roast asparagus salad with baked goat cheese

Yield: 4 servings
Ingredients
  • 1/4 cup olive oil
  • 1/4 cup shallot, minced
  • 2 tablespoons balsamic vinegar
  • 1 teaspoon Dijon mustard
  • 4 cups frisee
  • salt and pepper
  • 2 pounds asparagus
  • olive oil
  • kosher salt
  • black pepper
  • 1 cup flour
  • 1 egg, beaten
  • 1 cup milk
  • 2 cups panko breadcrumbs
  • 4 slices goat cheese (3/4 inch slices)
Cooking Directions
  1. Place the shallot and olive oil in a skillet and cook for 2 minutes over medium heat.
  2. Add the vinegar, mustard, salt, pepper, and stir well to incorporate. Set aside and cool to room temperature.
  3. Preheat the oven to 375 F.
  4. Break off the tough ends of the asparagus, and, if they're thick, peel them.
  5. Place the asparagus on a baking sheet, drizzle with olive oil, then toss to coat the asparagus completely. Spread the asparagus in a single layer and sprinkle liberally with salt and pepper.
  6. Roast the asparagus until tender but still crisp.
  7. Meanwhile, put the flour in one bowl, mix the egg and milk in one bowl, and put he breadcrumbs in one bowl.
  8. Dip the cheese slices into the flour, then the egg-milk wash, and then into the breadcrumbs, alternating your hands.
  9. Refrigerate until ready to use.
  10. When ready to use, turn the oven broiler to low. Place the goat cheese discs onto an oiled pan and place under the broiler on high. Broil until brown.
  11. Toss the frisee in the dressing until well-coated, then season with salt and pepper.
  12. Plate, and top each salad with a goat cheese disk and asparagus spears. Finish with extra salt and pepper.

February 27, 2015

Stuffed Peppers

No comments:
Yum
Stuffed peppers are incredibly easy, yet seem fancy and nostalgic at the same time. Of course you can have the filling be whatever you like, but the following recipe works pretty well. Some versions include and slightly watered-down ketchup that is poured over the filled peppers before adding the cheese on top, though we found that wasn't necessary and made it a little too sweet. Just keep the basic method for blanching the peppers the same, and you can go to town on whatever filling you want. Enjoy!


Stuffed Peppers

Yield: 4 servings
Ingredients
  • 4 bell peppers, tops removed, cored and seeded
  • 1/2 cup rice
  • 1 1/2 tablespoons olive oil
  • 1 onion, minced
  • 12 ounces ground meat
  • 3 garlic cloves, minced
  • 1 14.5 ounce can diced tomatoes, drained
  • 5 ounces (about 1 1/4 cups) cheese, shredded
  • 2 tablespoons fresh parsley, chopped
  • salt and pepper
Cooking Directions
  1. Boil 4 quarts of water with 1 tablespoon salt in a large pot. Cook peppers until they begin to soften, about 3 minutes. Remove and drain peppers with a slotted spoon or tongs.
  2. Add the rice to the pot and cook until tender, about 13 minutes. Drain rice and transfer to a large bowl.
  3. Heat the oil in a large skillet over medium-high heat. Add the onion, stirring occasionally, until it begins to brown, about 5 minutes. Add the ground meat, breaking it into small pieces until no longer pink, about 4 minutes. Stir in the garlic and cook for 30 seconds. Transfer to the bowl with the rice.
  4. Add the tomatoes, 1 cup of cheese, the parsley, and salt and pepper to taste.
  5. Heat the oven to 350 F with the rack in the middle.
  6. In a 9-inch square baking dish, place the peppers cut side up. Divide the filling evenly among the peppers. Sprinkle the rest of the cheese on top.
  7. Bake until the cheese in browned and the filling is heated through, 25 to 30 minutes. Serve immediately.

January 16, 2015

Baked Sprouted Falafel

No comments:
Yum
This falafel is extremely easy. All you need is a food processor to make the falafel dough and you're all set. Even better, they're baked and still get a crispy crust on the outside. Enjoy with your favorite sauces, hummus, whatnot. The only thing you really have to prep for in the sprouting, but that super easy. Make them bigger ro smaller too. Experiment and go crazy. I'd like to see one giant falafel. Enjoy!


The Easiest Gluten-free Sprouted Baked Falafel

Yield: 6-8 servings
Ingredients
  • 1 cup dried chickpeas
  • 1 garlic clove, chopped
  • 1/2 onion, quartered
  • 1 teaspoon cumin
  • 1/2 teaspoon cayenne pepper
  • 1/2 cup fresh parsley
  • 1/2 teaspoon salt
  • 1/4 teaspoon baking soda
  • 1/2 tablespoon lemon juice
  • 2 tablespoons olive oil

December 30, 2014

Middle Eastern Salad

No comments:
Yum
Here is a great recipe for a simple and delicious salad that is very common in the Middle East. Some call it an Israeli salad, but I believe it is made (with slight variations) across the region. Enjoy!


Middle Eastern Salad

Yield: 8 servings
Ingredients
  • 1 lb cucumbers, diced
  • 1 lb tomatoes, diced
  • 1/2 cup fresh parsley, minced
  • 3 tablespoons olive oil
  • 3 tablespoons lemon juice
  • salt
Cooking Directions
  1. Mix all ingredients together. Add salt to taste.
  2. Best served immediately, as the salt will extract the juices from the vegetables and make it more liquidy.

December 17, 2014

Oleana's Whipped Feta

No comments:
Yum
Maybe you've been to Oleana, one of the best restaurants around Boston, and maybe you haven't but you love feta. This recipe will give you a beautiful whipped feta spread that goes great with cucumbers, bread, or just plain. If you've had Oleana's, let me know how this compares. Enjoy!

Oleana's Whipped Feta

Yield: 1+ cups
Ingredients
  • 1 roasted red pepper
  • 1/2 pound feta cheese
  • 2 teaspoons crushed red pepper
  • 1/4 teaspoon smoked paprika
  • 1 teaspoon lemon juice
  • 1/8 cup olive oil
Cooking Directions
  1. Discard the skin of the peppers and pulse a couple times in a food processor.
  2. Add remaining ingredients and blend the mixture for about 2 minutes, until very smooth.
  3. Refrigerate for about 30 minutes before serving to allow the dip to set.

December 03, 2014

New York Street Cart Chicken and Rice

No comments:
Yum
If you've ever had the chicken and rice from the Halal Guys in New York (or just about any of the other carts), you've likely dreamed about making it at home too. Here's a recipe for that deliciousness that closely hits the mark. Enjoy!


New York Street Cart Chicken and Rice

Yield: 6-8 servings
Ingredients
    For the chicken:
  • 2 tablespoons lemon juice
  • 1 tablespoon dried oregano
  • 1/2 teaspoon ground coriander
  • 3 garlic cloves, chopped
  • 1/8-1/4 cup olive oil
  • salt and pepper
  • 2 pounds boneless, skinless chicken thighs, trimmed of fat
  • 1 tablespoon canola oil
  • For the rice:
  • 2 cups rice, uncooked
  • 1/2 teaspoon turmeric
  • 1/4 teaspoon ground cumin
  • water
  • salt and pepper
  • For the white sauce:
  • 1/2 cup plain yogurt
  • 1 tablespoon vinegar
  • 1 teaspoon lemon juice
  • 1/4 cup fresh parsley
  • salt and pepper
  • To serve:
  • 1 lettuce, shredded
  • 1 tomato, cut into wedges
Cooking Directions
  1. For the chicken: Combine the lemon juice, oregano, coriander, garlic, and olive oil in a ziploc bag. Season the marinade to taste with kosher salt and black pepper. Place the chicken in the bag. Turn the chicken to coat, seal the bag, and marinate the chicken in the refrigerator for 1 to 4 hours, turning occasionally to redistribute the marinade.
  2. Remove the chicken from the bag. Season with kosher salt and a lot of pepper. Heat the canola oil in a large skillet over medium-high heat until it is lightly smoking. Add the chicken pieces and cook without disturbing until they are lightly browned on the first side, about 4 minutes. Flip the chicken and reduce the heat to medium. Cook until the chicken is cooked through, about 6 minutes longer. Transfer the chicken to a cutting board and allow to cool for 5 minutes.
  3. Roughly chop the chicken into 1/2- to 1/4-inch chunks. Transfer to a medium bowl, add the marinade, cover, and refrigerate while you cook the rice and prepare the sauce.
  4. For the rice: Put rice in rice cooker. Add the turmeric and cumin. Add water to the suggested amount for 2 cups. Season with salt and pepper. Cook as normal.
  5. For the white sauce: In a small bowl, combine the yogurt, vinegar, lemon juice, parsley, and 2 teaspoons black pepper. Season to taste with salt.
  6. To serve: Return the entire contents of the chicken bowl to the skillet. Cook over medium-high heat, stirring occasionally, until heated through. Pile the chicken on top of the rice and lettuce. Top with the white sauce. Serve immediately.

November 19, 2014

Base Frittata Recipe

No comments:
Yum
This is merely a base recipe for a frittata. You can put pretty much anything you want in a frittata, as long as you cook certain things beforehand. Some vegetables definitely need to be cooked before going in the oven, along with any meat you might use.

As you can see, we topped ours with avocado. Yep, delicious. Enjoy!


Base Frittata Recipe

Yield: 6-8 servings
Ingredients
  • 12 eggs
  • 3 tablespoons water
  • 1/4 teaspoon salt
  • 1/4 teaspoon black pepper
  • 1 teaspoon herbs
  • 1 onion, chopped
  • 1/2 lb vegetables
  • 2 teaspoons oil
Cooking Directions
  1. Adjust oven rack to upper-middle position.
  2. Whisk eggs, water, the salt, the pepper, and herbs in medium bowl until well combined. Set eggs aside.
  3. Heat oil in 12-inch oven-safe skillet over medium heat until shimmering. Add onion and cook until it softens slightly. Add vegetables and cook until beginning to brown.
  4. Turn on broiler.
  5. Add egg mixture to skillet and cook, using spatula to stir and scrape bottom of skillet, until large curds form but eggs are still very wet, about 2 minutes. Shake skillet to distribute eggs evenly; cook without stirring for 30 seconds to let bottom set.
  6. Put skillet under broiler and broil until frittata has risen and surface is puffed and spotty brown, 3 to 5 minutes.
  7. When cut into with a knife, eggs should be slightly wet and runny. Remove skillet from oven and let stand 5 minutes to finish cooking.
  8. Using spatula, loosen frittata from skillet and slide onto cutting board. Cut into wedges and serve.

September 24, 2014

Chinese Chicken Salad

No comments:
Yum
Here is a recipe passed down from grandma to ma to my wife. She loves to make this. It's like a nostalgic reminder of her childhood, especially the holidays. Personally, I could do without the maifun, so if you don't want it, try it without.

This recipe also walks you through cooking and shredding the chicken, but if you already have some on hand or prefer another method, I'd love to hear it! Enjoy!


Chinese Chicken Salad

Yield: 8+ servings
Ingredients
  • 2 lbs chicken breasts
  • 1 tablespoon canola oil
  • 3/4 cup water
  • salt and pepper
  • 1 head iceberg lettuce, chopped and sliced
  • 1 package maifun
  • oil for deep frying
  • 3 green onions, only the green parts, sliced
  • 1/8 cup toasted almonds
  • 1/16 cup toasted sesame seeds
  • 4 tablespoons sugar
  • 3 teaspoons salt
  • 1/2 teaspoon black pepper
  • 4 tablespoons white vinegar
  • 1/4 cup canola oil
Cooking Directions
  1. Pat the chicken breasts dry and season with some salt and pepper. In a large skillet, heat the 1 tablespoon of canola oil, and cook the chicken breasts top-side down until browned, about 5 minutes. Flip the breasts and add the water and additional salt to the water. Cover and simmer on low for 7-10 minutes, until cooked. Let cool slightly (at least 15 minutes) before shredding.
  2. Deep fry the maifun in batches until all are puffed up. Set aside on plates with paper towels.
  3. For the dressing, mix together the last 5 ingredients.
  4. When ready to serve, mix the chicken and lettuce together. Then add in the maifun, then the green onions, almonds, and sesame seeds. Finally, mix in the dressing.

August 27, 2014

Garlic Broccoli Rabe

No comments:
Yum
Here's a recipe for some simple and delicious broccoli rabe. It's basically a recipe you can employ with any green, more or less. Enjoy!

Garlic Broccoli Rabe

Yield: 4 servings
Ingredients
  • 2 bunches broccoli rabe
  • 6 garlic cloves, sliced
  • 1-2 tablespoons olive oil
  • 1/2 teaspoon crushed red pepper
  • 1/4 teaspoon salt
  • 1/2 teaspoon black pepper (optional)
Cooking Directions
  1. Rinse and drain the broccoli rabe. Cut off and discard the tough ends and cut the rest of into 2-inch pieces.
  2. Heat the olive oil in a large pot or pan. Over low heat, cook the garlic, stirring occasionally, until golden brown. Remove the garlic and set aside.
  3. Add the broccoli rabe stems to the hot oil. Cook for 3-5 minutes, covered. Add the rest of the broccoli rabe, red pepper flakes, salt, and pepper and cook, covered, over medium low heat for 5 to 10 minutes, stirring occasionally, until the stalks are tender.
  4. Add the reserved garlic, season additionally to taste, and serve hot.

August 13, 2014

Roasted Chicken Thighs

No comments:
Yum
With this basic recipe for roasted chicken thighs, you'll have tender, juicy meat every time. Play around with the different options and let me know what works best for you. Personally, I like 2 tbs white wine and 2 tbs lemon juice. Enjoy!


Roasted Chicken Thighs

Yield: 4 servings
Ingredients
  • 1 lb boneless chicken thighs
  • 2 carrots, sliced
  • 4 garlic cloves, chopped
  • 1-2 any other root or roasting vegetable
  • 2 tablespoons olive oil
  • 4 tablespoons other liquids, such as lemon juice, white wine, etc.
  • 1 teaspoon dried herbs
  • 1 teaspoon kosher salt
  • 1/2 teaspoon black pepper
Cooking Directions
  1. Heat the oven to 425°F. Place the chicken thighs in a large bowl. Add veggies to the bowl with the chicken. Add dried herbs.
  2. Add the garlic, olive oil, and other liquid to the bowl. Toss all the ingredients together, and add the salt and black pepper.
  3. Spread the chicken and veggies on a large baking sheet, arranging the veggies around the outside and placing the chicken pieces closely together in the center. Pour any remaining juices in the bowl over the chicken.
  4. Roast for 30 minutes, or until the chicken reaches an internal temperature of about 160°F. Take the pan out of the oven, and cover with foil. Let it rest for about 5 to 10 minutes before serving.

June 25, 2014

The Best Roasted Brussels Sprouts

No comments:
Yum
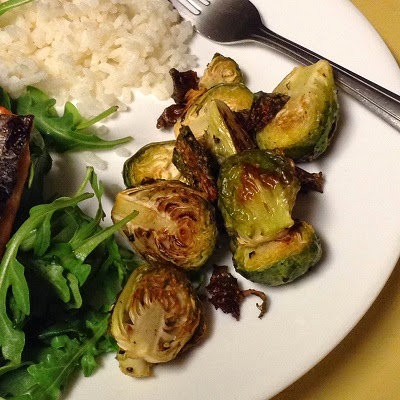
They say simplest roasting is sometimes the best way to roast. I tend to agree. And what could be simpler than a little olive oil, kosher salt, and freshly ground black pepper?

The roasting brings out the holy-cow-I-didn't-know-Brussels-sprouts-could-be-this-delicious aspect we've all been looking for from this tiny little cabbage. Enjoy!

The Best Roasted Brussels Sprouts

Yield: 4 servings
Ingredients
  • 1 lb Brussels sprouts
  • 1 tablespoon olive oil
  • 1/2 teaspoon kosher salt
  • 1 teaspoon fresh black pepper
Cooking Directions
  1. Heat oven to 400 F.
  2. Cut off bottoms of Brussels sprouts and cut sprouts in half.
  3. In a large bowl, toss sprouts with 1 tablespoon of olive oil and the salt and pepper.
  4. Place on a large baking sheet and put on the middle rack of the oven.
  5. Cook for 15-20 minutes, flipping once and removing extra crispy pieces.
  6. They are done when soft on the inside.

June 05, 2014

Crispy Skin Salmon

No comments:
Yum
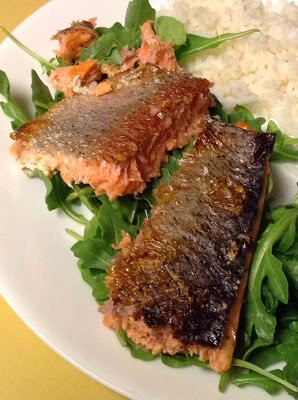
Usually, salmon is cooked so that the skin is discarded before or after cooking. Or, if it's scaled, it's soft, though still tasty. This is a mistake. Salmon skin is delicious. And when it's crispy, it's divine.

Yes, you'll have to scale the filet. Which sucks. It's just not fun, though it's not hard. But it is well worth it. Enjoy!


Crispy Skin Salmon

Yield: 4-8 servings
Ingredients
  • 1-2 lb salmon filet
  • 1-2 tablespoons oil
  • salt and pepper
  • optional: lemon juice
Cooking Directions
  1. Scale the filet. Set the oven to broil.
  2. Place in a baking dish large enough so that it lays flat.
  3. Pat dry, and rub oil over both sides of the salmon, also making sure the bottom of the dish is oiled.
  4. Salt and pepper both sides as well.
  5. Set the filet skin side up.
  6. Place the dish 4 inches from the broiler.
  7. The salmon is done when the skin is starting to darken, is crispy, and the rest of the filet appears cooked through.
  8. Serve immediately. If desired, splash some lemon juice underneath while plating, so as not to ruin the crispy skin.