Showing posts with label honey. Show all posts

April 17, 2015

Stuffed Roast Pork Loin

No comments:
Yum
This one's a little tricky and takes a little time, yet the roast that emerges is savory with a not-too-sweet stuffing. It's huge and well worth it. It also works extremely well without the stuffing. The brine is just that delicious. Enjoy!

Stuffed Roast Pork Loin

Yield: 8-10 servings
Ingredients
  • 2 quarts pork brine
  • 2.5 pound pork loin roast
  • 1/2 cup fennel, cut into 1 1/2 by 1/2 inch pieces
  • canola oil
  • 1 teaspoon garlic, minced
  • 1 tablespoon onion, chopped
  • 1 cup fig and balsamic jam
  • 1/4 cup stock
  • 1/4 teaspoon dried thyme
  • kosher salt and fresh black pepper
  • Pork Brine
  • 1/4 cup honey
  • 12 bay leaves
  • 3 tablespoons rosemary
  • 1/4 teaspoon dried thyme
  • 1 teaspoon dried parsley
  • 1/2 cup garlic cloves, crushed, skin on
  • 2 tablespoons black peppercorns
  • 1 cup kosher salt
  • 8 cups water
  • Fig and Balsamic Jam
  • 0.8 pounds figs, preferably Black Mission or Kadota, stems removed and coarsely chopped
  • 1/2 cup sugar
  • 1/4 cup balsamic vinegar
  • 1/2 teaspoon black peppercorns, tied in a sachet
  • lemon juice
Cooking Directions
    Pork Brine
  1. Combine all ingredients in a large pot and bring to a boil. Boil for 1 minute, stirring to dissolve salt. Remove from heat and cool completely, then chill before using.
  2. Fig and Balsamic Jam
  3. Combine figs, sugar, balsamic vinegar, and sachet in a large saucepan. Bring to a simmer over medium-high heat, then lower to maintain a gentle simmer. Cook, stirring to break up large chunks of fig, until the jam reaches 215 F to 220 F. Remove from heat and remove the sachet. Add lemon juice to taste. Let cool to room temperature.
  4. Pork Roast
  5. Pour the brine into a large container and add the pork. Refrigerate for 10 hours but no longer.
  6. Remove pork and rinse. Pat dry or let air dry. Discard brine.
  7. With a long knife, make a horizontal lengthwise cut all the way through the center of the loin. Work from both ends. Then make a vertical cut to form a cross.
  8. Set a rack over a baking sheet and line with paper towels.
  9. Heat a small amount of canola oil in a medium pan over medium heat, cook fennel for 2-3 minutes until just tender. Add garlic and shallot and cook for 1 minute. Stir in the jam until warm, then add stock, thyme, and salt and pepper to taste. Stir until combined. Transfer to a bowl and let it cool completely.
  10. Preheat the oven to 350 F. Put a roasting rack in a roasting pan and put it in the oven.
  11. Meanwhile, use your fingers to widen the cavity in the meat. Stuff the pork loin from both ends all the way to the center. Tie the loin with kitchen twine.
  12. Season the loin with salt and pepper all over. Heat some more canola oil in a large pan over medium-high heat until smoking. Brown the loin on all sides, 2-3 minutes per side.
  13. Transfer the pork to the roasting pan and roast for 30-40 minutes, or until the pork is 135 F to 140 F. Remove from the oven and let it rest in a warm spot for 30 minutes.
  14. Remove the string and cut into 1/4 inch slices. Plate and sprinkle with coarse salt.

March 27, 2015

Healthy Granola Bars

No comments:
Yum
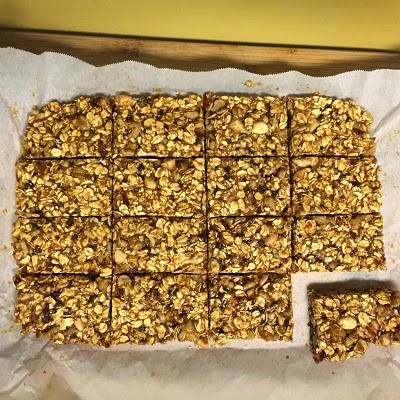
Most often, granola bars are laden with lots of extra sugar and less-than-good-for-you ingredients. The "healthy" part of them all but disappears at that point. Sure, there are a few good ones out there now, but they can be expensive. For the same price you can make an entire batch or more.

The best part is that the recipe below can be tweaked to your liking. Don't like dates? Sub in raisins. Want to cut back on the honey? Go for it. Got a thing against peanut butter? Well then you're crazy and I just can't help you. Or use a nut/seed butter. The possibilities are endless! Enjoy!

Healthy Granola Bars

Yield: 16 servings
Ingredients
  • 1 cup dates
  • 1/4 cup honey
  • 1/4 cup peanut butter
  • 1/2 cup walnuts, roasted
  • 1/2 cup peanuts, roasted
  • 1 1/2 cups rolled oats
Cooking Directions
  1. Soak dates in water for 10 minutes.
  2. Process dates in a food processor until small bits remain (about 1 minute). It should be able to roll into a ball, with a dough consistency.
  3. Toast the oats at 350 F in the oven until slightly golden brown, about 15 minutes.
  4. Place oats, nuts, and dates in a bowl.
  5. Warm honey and peanut butter in a small pan over low heat. Stir and pour over oat mixture and then mix, breaking up the dates.
  6. Once mixed, transfer to an 8x8 or 7x11 dish lined with parchment paper.
  7. Press down until uniformly flat. Cover with parchment paper, and let set in the fridge for 15-20 minutes to harden.
  8. Remove bars from pan and chop into 16 bars. Store in an airtight container in the fridge or wrapped up in the freezer.

January 23, 2015

Honey Walnut Cigars

No comments:
Yum
If you've ever had a craving for baklava but really don't want to spend the next few hours making it, this will satisfy you. It's simple and much quicker. I threw this together with some extra filo dough and nuts we had around. It really hits the spot for a healthy filo dessert. Enjoy!


Honey Walnut Cigars

Yield: 8 servings
Ingredients
  • 4 sheets filo dough
  • 1/2 cup walnut pieces
  • 3 tablespoons honey
  • 3 tablespoons water
  • 1 tablespoon citrus juice
Cooking Directions
  1. Tear a sheet of filo in half length-wise.
  2. Put some walnut pieces in the sheet, and roll it around the walnuts.
  3. Do this for all 8 cigars.
  4. Arrange in a dish, and bake in 350 degree oven until golden brown. This shouldn't take too long.
  5. Remove from oven to cool.
  6. Meanwhile, bring the honey, citrus juice, and water to a boil and then simmer.
  7. Lightly pour the honey mixture over the cigars. Let cool.

July 31, 2013

Baklava

No comments:
Yum


Baklava, that super treat that goes for a crazy amount per piece. Well, you can probably get half this dish (well, close enough) for the same price by making it at home. Super easy, simple, and exceedingly delicious. Guests will rave for days about it. Enjoy!

Baklava

Yield: a whole lot of baklava!
Calories per serving: you don't wanna know
Ingredients
  • 1 cup sugar
  • 1 cup honey
  • 3/4 cup water
  • 1 tablespoon lemon juice
  • 2 teaspoons cinnamon
  • pinch cloves
  • 1 pound walnuts, or mix of any nut
  • 1 teaspoon cinnamon
  • 1/4 teaspoon salt
  • 1 stick unsalted butter
  • 1 pound phyllo dough, thawed
Cooking Directions
  1. Combine the sugar, honey, water, lemon juice, 2 teaspoons of cinnamon, and cloves in a medium saucepan. Cook over medium heat, stirring occasionally with a wooden spoon, until the sugar has dissolved. Reduce the heat to medium-low and cook until the syrup is slightly thickened, about 10 minutes. Let cool.
  2. Finely chop the nuts or pulse in a food processor. In a medium mixing bowl, combine the nuts, 1 teaspoon cinnamon, and salt and stir well to combine.
  3. Melt the butter.
  4. Using a pastry brush, lightly coat a 13 by 9-inch or 15 by 10-inch baking dish with some of the melted butter.
  5. Open the package of thawed phyllo and lay the thin sheets on a clean work surface. Measure the phyllo sheets; if the type you have purchased measures approximately the same size as the baking dish you are using, then proceed from here. If they are larger than your baking dish, use a sharp knife to cut the phyllo sheets approximately the same size as your baking dish. Keep any scraps for another use. Cover the sheets with a piece of plastic wrap and a lightly damp kitchen towel, as the sheets of phyllo dry out very quickly if left uncovered.
  6. Position rack in center of oven and preheat the oven to 350 degrees F.
  7. Place 1 of the sheets of phyllo in the bottom of the buttered baking dish and lightly brush with some of the melted butter. Repeat this procedure with 6 more sheets of phyllo, for a total of 7 layers. Measure about 3/4 cup of the nut mixture and spread the nut mixture evenly over the buttered phyllo sheets. Repeat with 7 more sheets of phyllo, buttering each layer as before, and top these sheets with another 3/4 cup of the nut mixture. Continue this layering process, buttering 7 sheets of phyllo and topping each 7 sheets with 3/4 cup of the nuts, until you have used all of the nut mixture. Layer any remaining sheets of phyllo on top, buttering between each layer, until all of the phyllo sheets have been used.
  8. Use a sharp knife to make 4 cuts lengthwise through the layered phyllo at 1 1/2 inch intervals. (You should end up with 5 lengthwise strips 1 1/2 inches wide.) Now use your knife to cut diagonally across the strips at 1 1/2-inch intervals to form diamond shapes. You should end up with approximately 36 diamond-shaped pieces of baklava in the baking dish.
  9. Bake the baklava until golden brown, about 40 minutes.
  10. Using oven mitts or pot holders, remove the baklava from the oven and set aside on a wire rack to cool for 5 minutes. Using a ladle or small measuring cup, slowly drizzle the cooled syrup over the warm baklava. Allow to stand several hours before serving.
  11. Adapted from Emeril.

May 31, 2011

Disney's Berry Crisp with Strawberry Sorbet

No comments:
Yum

Berry Crisp with Strawberry Sorbet

Food and Wine Festival

Serves 8

Ingredients

Sorbet

3 c. fresh strawberries, hulled and quartered
½ c. honey
1 c. sugar
3 T. lemon juice

Filling

1 lb. fresh raspberries
1 lb. fresh blueberries
1 lb. fresh blackberries
1 lb. ripe strawberries
4 oz. granulated sugar
1 oz. flour
1 ½ oz. Grand Marnier
Zest of 1 orange

Crisp Topping

17 oz. sugar, divided
17 oz. brown sugar, divided
7 oz. oats
14 oz. pecans
14 oz. walnuts
8 oz. melted butter
6 oz. coconut flakes
16 oz. flour
6 oz. soft butter

Directions

Sorbet

1. Place the strawberries in a food processor and puree until smooth.
2. Strain the strawberries through a fine chinois.
3. Whisk in the honey, sugar, and lemon juice.
4. Mix well and pour into an ice cream maker.
5. Allow to freeze overnight.

Filling

1. Hull and quarter the strawberries.
2. Toss strawberries and all of the remaining fruit with the sugar, flour, and Grand Marnier.
3. Place the filling into ramekins and top with Crisp.

Crisp

1. Preheat oven to 375 degrees.
2. In a large bowl, mix 11 ounces of sugar, 11 ounces of brown sugar, oats, pecans, walnuts, coconut flakes, and melted butter.
3. Mix well with a wooden spoon. Then in a food processor grind the mixed ingredients together in small batches.
4. Back in the large bowl, mix the blended ingredients with the remaining sugar, flour, brown sugar and soft butter. Mix well then top the fruit filled ramekins.
5. Bake at 375 for 25 to 30 minutes.
6. Top with sorbet and serve.

Disneyland's Cornbread with Honey Butter

No comments:
Yum


Disneyland's Cornbread with Honey Butter

Yield: Serves 12
Ingredients
  • 1/2 cup canola oil
  • 1 cup sugar
  • 2 eggs
  • 2 1/2 cups water
  • 2 1/2 cups all-purpose flour
  • 1 cup pastry flour
  • 1/2 cup powdered milk
  • 2 tablespoons baking powder
  • 1 tablespoon salt
  • 1 tablespoon vanilla
  • 1 cup yellow cornmeal
Cooking Directions
  1. Preheat oven to 400 degrees F. Grease 9x13 baking pan. Set aside.
  2. In a large bowl blend together oil, sugar, and eggs for two minutes.
  3. Add 2 cups of the water and mix until blended with sugar mixture.
  4. Add flours, powdered milk, baking powder, salt and vanilla. Mix ten minutes at low speed.
  5. Add remaining 1/2 cup water and cornmeal. Mix five minutes more.
  6. Pour into prepared pan. Bake 40 to 50 minutes or until golden brown and tester comes out clean. Serve with Honey Butter.


Honey Butter

Ingredients
  • 1/3 cup honey
  • 2 cups (1/2 pound) butter, softened
Cooking Directions
  1. Beat honey into softened butter until blended. Refrigerate in small molds or serve in bowls.

Disneyland's Chocolate and Coffee Yule Log

No comments:
Yum

Chocolate and Coffee Yule Log

Disneyland Holiday Recipe

Makes a 15 inch Yule Log

Ingredients

Kahlúa Simple Syrup

1 cup granulated sugar
1 cup water
3 tablespoons Kahlúa Liqueur

Biscuit Roulade

1/2 cup pastry flour or all-purpose flour, sifted
1 teaspoon baking powder, sifted
1/4 cup cocoa, sifted
4 egg yolks, room temperature
1 cup sugar, divided
4 egg whites, room temperature

Coffee Buttercream

1 cup water, divided
3 tablespoons coffee grinds
1 cup fine granulated sugar
5 large egg whites, room temperature
1 1/2 cups unsalted butter, cold and cubed
2 teaspoons vanilla extract

Chocolate Ganache

11 ounces dark chocolate (58% cacao)
1 tablespoon butter
2 teaspoons honey
1 cup heavy whipping cream

Directions

For Kahlúa Simple Syrup

1. Place the granulated sugar and water in a small sauce pan over medium heat and whisk until the sugar is completely dissolved. Bring to a boil, then remove from heat and add the Kahlúa.
2. Stir to combine and allow syrup to cool completely.

For Biscuit Roulade

1. Preheat oven to 375º F. Butter and flour a 15x10x1-inch jelly-roll pan. Line bottom with parchment paper. Butter and flour parchment paper also.
2. Combine flour, baking powder, and cocoa in a small mixing bowl, set aside.
3. Beat egg yolks in a medium mixing bowl with an electric mixer on high speed for 5 minutes, or until thick and lemon colored. Gradually add 1/2 cup of the sugar, beating on high speed till the sugar is dissolved. Thoroughly wash and dry the beaters.
4. Beat egg whites in a large mixing bowl with an electric mixer on medium speed for 5 minutes, or until soft peaks form. Slowly add the remaining 1/2 cup of sugar, beating on medium speed till stiff peaks form.
5. Carefully fold egg yolk mixture into the egg whites, using a rubber spatula. Once all the egg yolk mixture has been incorporated, sprinkle the flour mixture over the egg mixture and fold in gently just to combine.
6. Spread batter evenly into the prepared jelly-roll pan. Bake for 12 to 15 minutes, or until the cake springs back when lightly touched near the center.
7. Lay out a clean, thin cotton kitchen towel on a work surface; dust with confectioners' sugar on the top, set aside.
8. Immediately after removing the cake from the oven, loosen the edges of the cake from the pan using a knife.
9. Turn cake out onto the sugared kitchen towel, parchment paper side up. Carefully pull off the parchment paper.
10. Fold towel over the longest side of the cake and roll up the cake with the towel inside.
11. Cool on a rack with the seam side down.

For Coffee Buttercream

1. Bring 1/2 cup of water to a boil in a small saucepan over high heat. Remove from heat and add coffee grinds; allow to steep for 5 minutes. Strain through a coffee filter into a small bowl and set coffee concentrate aside.
2. Mix the remaining 1/2 cup of water and sugar in a heavy 2-quart saucepan over medium-high heat. Clip a candy thermometer to the pan and heat to 240º, soft-ball stage (18-20 minutes). Keep the edge of the saucepan clean by brushing it with a pastry brush moistened with water as needed.
3. Once the temperature reaches 240º, remove the candy thermometer and remove from heat.
4. Beat egg whites in a large mixing bowl with an electric mixer on medium speed for 5 minutes, or until soft peaks form. Gradually pour the hot mixture in a thin stream over the whites while continuing to beat the mixture for 2-3 minutes. Scrape the sides of the bowl as needed and continue to beat until a meringue forms.
5. Add the butter all at once, and beat on medium speed until incorporated. Increase speed to high and continue beating for 8-10 minutes, or until smooth and shiny. Add vanilla extract and coffee concentrate, mix for one minute until combined. Set aside.

For Chocolate Ganache

1. Place the chocolate, butter, and honey in a large mixing bowl and set aside.
2. Heat the whipping cream in a small saucepan over medium heat for 2-3 minutes, or until it begins to boil. Remove from heat and pour cream into the chocolate mixture. Whisk until smooth.
3. Set aside and allow the ganache to come to room temperature.

To Assemble

1. Unroll cake, remove towel. Using a pastry brush, "baste" the cake with the Kahlúa simple syrup.
2. Evenly spread the coffee buttercream over cake to within 1 inch of the edges. Re-roll the cake to form the "log." Place, seam-side down, on a serving platter.
3. Spread the chocolate ganache over the top and sides of the cake.
4. Score ganache with the tines of a fork to resemble the bark on a log.
5. Decorate as desired and refrigerate for an hour to let the ganache set.

Cook's Notes

Make sure you butter and flour the parchment paper after putting it on the jelly-roll pan. This will make it easier to remove the paper from the cake when cooked.
Always thoroughly clean and dry your electric mixer beaters before using them for another procedure-especially when working with egg whites. If the beaters have any residue or water on them, the egg whites will not form as needed.
You can decorate the Yule Log with meringue mushrooms, flowers, and leaves.

Disneyland's Cafe Orleans Smoked Chicken Salad

No comments:
Yum
Smoked Chicken Salad (Marquis)

Cafe Orleans

Ingredients

In a salad bowl, combine (no amounts given):

Salad greens
Radicchio
Romaine

Vegetables
Celery
Jicama
Cherry tomatoes

Fruits
Orange slices
Apple pieces

Directions

Top salad mix with smoked chicken breast pieces and garnish with walnuts and fresh chives. Serve with ginger honey-mustard dressing.


Ginger Honey-Mustard Dressing

Ingredients

3 oz ginger root
2 egg yolks (or 2 oz pasteurized egg substitute, such as Egg Beaters)
1 1/8 oz honey
18 oz olive oil
1 oz dijon mustard
4 oz apple cider
1/2 oz salt
1/3 oz pepper
Juice of three limes

Directions

Blend all ingredients together. Makes 1 quart.

March 23, 2011

Chewy Peanut Butter Chocolate Chip Cookies

2 comments:
Yum

I love a soft, chewy cookie. Something about hard, crunchy cookies is a big turn off in most cases. Bleh!

So these cookies are perfect because I also love peanut butter. A soft, light, chewy peanut butter cookie is just what the day needs sometimes to end just right.


Omitting the chocolate does not diminish how delicious these are. In fact, I think they might be even better without it, though some chocolate fiends might disagree.

And the size is perfect. Small enough to get the full effect without feeling like you're gorging on cookies. So sometimes two is even ok!

March 18, 2011

Honey Wheat Sandwich Bread

2 comments:
Yum

Another day, another wonderful homemade bread. This one is even better than our other favorite, the Whole Wheat and Oatmeal Bread.


This difference isn't so much in the taste. It's in the texture, the softness of the bread (perfect for sandwiches and toast alike), and in the rise.


So fire up that oven, and get ready to enjoy some delicious bread made in your very own home in no time. You can't beat the smell of bread baking!

February 21, 2011

Fruit Parfait Surprise

2 comments:
Yum

Valentine's Day is great. It means something different to everyone - whether you love it or hate it or are generally apathetic. But it's definitely a dessert kind of holiday. (Aren't most?)


The best kinds of desserts are the light ones you feel you can indulge on forever. Like fruit parfaits! By the way, the surprise is at the bottom of the glass, of course. Enjoy!

August 27, 2010

Muesli with Yogurt

No comments:
Yum

I think there's something wrong with my camera. See that purple line at the top? Not too pretty. And the display screen doesn't seem to work as well as it once did. And the pictures don't seem to come out as clear (not that they were ever that awesome to start. Any tips for fixing it would be sincerely appreciated!

Anyway, on to the goods! Muesli - sweet, sweet muesli. I'm not a fan of plain milk, so I make my own yogurt a lot. But I love muesli. There's something about leaving it overnight to soak up everything that I love. Plus, it's perfect for a hot summer day.


It's also pretty much perfect because I don't have to spend time over a hot stove cooking oatmeal to get my oats fix. And it's also pretty much perfect because you can toss in whatever your little heart desires, as I've done here. Read on for the specifics. Enjoy!

July 28, 2010

Ebelskivers!

1 comment:
Yum

We got a gift recently - an ebelskiver pan. You probably know what an ebelskiver is already, but just in case you don't....think of an ebelskiver as a puffy filled pancake. Pretty awesome, huh?

Sure, you can go around using fancy and homemade ebelskiver/pancake batter, but not I. Why do that when all the fun is in the filling? That's where creativity reigns supreme!


For instance, you could do banana in one, chocolate tahini in another, honey and nut butter in another, strawberry jam in another, banana and peanut butter and bacon in another, and bacon and cheese in the last one. Ohhh yeah.


So let your heart and your imagination be your guide. Enjoy!

July 16, 2010

Honey Tart Frozen Yogurt

No comments:
Yum

*Beatles tune starts...now!* "Love, love, love. Love, love, love. Love, love, love. There's nothing you can do that can't be done..."


Anyway, that's pretty much how I feel about this frozen yogurt. Ever since the Strawberry Sorbet turned out surprisingly awesome, I've been wanting to make another kind of frozen treat. I'm not huge on ice cream (we don't mix well), so frozen yogurt was the way to go.

This is even easier than the sorbet. As someone I know would say, "It's stupid simple." Use the same process as when making the sorbet. It doesn't get easier than that.


This recipe is adapted from the Tart Vanilla Frozen Yogurt by Healthy Food For Living, where it's ultimately adapted from David Lebovitz's The Perfect Scoop, of course.

The difference between mine and HFFL is I wanted to test out regular yogurt instead of Greek yogurt, and I used less sweetener (only 1/4 cup instead of 1/2 cup) and went with honey so the tart could shine through. What happens is that both the honey flavor and tart are distinct yet meld together for a truly honey tart frozen yogurt. Probably because the yogurt wasn't strained or Greek-style, it hardens up and can be a little icy at first. Just let it rest on the counter for a few minutes, and you're golden. Next time I'll either try it Greek or add a dash of rum, both for flavor and creaminess. Enjoy!