Showing posts with label desserts. Show all posts

March 20, 2015

Flourless chocolate cake

No comments:
Yum
Flourless chocolate cake is one of those delicacies that seems difficult but is not. There are only a few ingredients, and the hardest part is letting a mixer beat the egg whites into stiff peaks. If you're gluten free, then you can have your cake and eat it too! Unless you eat the whole thing at once. And top is off with some fruit, whipped cream, and/or a caramel sauce. When it's this good, this becomes a judgement-free zone. Enjoy!

Flourless chocolate cake

Yield: 16 servings
Ingredients
  • 1 lb bittersweet chocolate, chopped into small pieces
  • 1 stick unsalted butter
  • 9 eggs, separated
  • 3/4 cup sugar
  • 1 teaspoon vanilla extract
Cooking Directions
  1. Preheat the oven to 375 F.
  2. Butter a springform pan.
  3. Put the chocolate and butter into a stainless steel mixing bowl and heat over (but not touching) about 1 inch of simmering water until melted, stirring occasionally.
  4. Meanwhile, whisk the egg yolks with the sugar and vanilla in a mixing bowl until pale yellow in color.
  5. Whisk the chocolate mixture into the egg yolk mixture.
  6. Beat the egg whites in a mixing bowl until stiff peaks form and fold into the chocolate mixture.
  7. Pour into the cake pan and bake until the cake is set and a toothpick inserted into the cake comes out with moist crumbs clinging to it, about 20 minutes. Let stand at least 10 minutes, then remove sides of pan.

February 20, 2015

The Easiest Macarons

No comments:
Yum

This is the simplest and easiest macaron recipe I have come across that actually works well. It's not complicated, nor does it require a lot of time. Even better, the almond meal mentioned in the recipe is the very cheap one that is sold at Trader Joe's. Did you know they also sell cashew meal? I've yet to try it but it'd probably make a delicious macaron as well.

Be sure to not get any yolk mixed in with the egg whites, otherwise it won't make the meringue correctly. And no stiff, glossy peaks makes everyone sad. Let me know how yours turn out and what you like filling yours with. Enjoy!


The Easiest Macarons

Yield: about 30 macarons
Ingredients
  • 1 1/3 cups powdered sugar
  • 2/3 cup almond meal
  • 3 egg whites, room temperature
  • 1/4 cup white sugar
Cooking Directions
  1. Through a sieve, sift the powdered sugar and almond meal together to remove large pieces.
  2. Using a stand mixer, whip the egg whites on low speed until frothy. Gradually add the sugar, and then whip on high speed until stiff peaks form. The egg whites should be glossy and thick.
  3. Fold half of the almond mixture into the egg whites. Add the rest. Fold the mixture 15 to 20 times; the batter will be thick and fall slowly from the spatula.
  4. Put the batter into a pastry bag. Pipe 1-inch circles onto baking sheets lined with silicon mats or parchment paper. Let rest until a skin forms on top and is dry to the touch, 15 to 30 minutes.
  5. Preheat the oven to 350 degrees F.
  6. Bake for 10 to 12 minutes, rotating the pans halfway through the baking time. If you are baking two sheets at a time, the bottom and top sheets should be switched to prevent browning on the bottom. If only baking one sheet at a time, bake on the bottom rack first for 5 minutes with an empty sheet on top. After 5 minutes, rotate the sheet and move the bottom sheet to the top and the top sheet to the bottom.
  7. You will know the macarons are done when you can touch them and the top of the macaron is set, and it does not slide around under your finger. The macarons must be set before you take them out of the oven. If the macaron tops slide, put them back in the oven on the middle rack for another 2 minutes.
  8. Let them cool for about 10 minutes on the baking sheet and then take them off. Fill as desired with your favorite fillings. A honey buttercream recipe follows. Allow the completed macarons to sit for at least a few hours.
For the honey buttercream:
Makes enough to fill about 40 macarons

Ingredients:
1/2 cup butter (1 stick), room temperature
1 cup powdered sugar
2 tablespoons honey

Cooking Directions:
In the bowl of a stand mixer, beat the butter using the whisk attachment for about 2 minutes. Slowly add the powdered sugar, and whisk until everything is incorporated. Do the same with the honey. Beat another minute or so to get everything well incorporated.

January 30, 2015

Ribbon Finger Jello

No comments:
Yum
Let's take a step back in time to when jello desserts were the bee's knees. Around that time is when you get some really weird ones that involved ham or candied things. Gross. But some of them were actually pretty decent, like this here recipe. It's a beautiful presentation of layers jello and gelatinized condensed milk. Luckily, it also tastes as good as it looks. Enjoy!


Ribbon Finger Jello

Yield: 1 big pan of jello
Ingredients
  • 3 oz package orange gelatin
  • 3 oz package lime gelatin
  • 3 oz package lemon gelatin
  • 3 oz package strawberry gelatin
  • 6 envelopes unflavored gelatin
  • 14 oz can condensed milk
  • 5 3/4 cup boiling water
  • 1/4 cup cold water
Cooking Directions
  1. Dissolve the orange gelatin and 1 envelope of unflavored gelatin in 1 cup of hot water. Pour into a 3 x 9 x 13 inch pan which has been lightly sprayed with oil. Chill until almost firm, approximately 20 minutes. If too firm, the next layer will slide off.
  2. Soften 2 envelopes of unflavored gelatin in 1/4 cup cold water. Add 3/4 cup hot water. In a separate bowl, mix the condensed milk with 1 cup boiling water. Combine both mixtures. Pour 1 cup of the new milk mixture over the first layer and add 1 cup between each subsequent layer.
  3. Repeat each gelatin procedure in this order: orange, lime, lemon, strawberry. Alternate with milk mixture and ending with a gelatin layer. While each layer is chilling, mix the next layer. If mixture becomes too thick, set in hot water or microwave. When completely firm, cut into desired size.
  4. For a quick method, place the pan with gelatin in the freezer for approximately 12 minutes, then approximately 8 minutes for each subsequent layer.

January 23, 2015

Honey Walnut Cigars

No comments:
Yum
If you've ever had a craving for baklava but really don't want to spend the next few hours making it, this will satisfy you. It's simple and much quicker. I threw this together with some extra filo dough and nuts we had around. It really hits the spot for a healthy filo dessert. Enjoy!


Honey Walnut Cigars

Yield: 8 servings
Ingredients
  • 4 sheets filo dough
  • 1/2 cup walnut pieces
  • 3 tablespoons honey
  • 3 tablespoons water
  • 1 tablespoon citrus juice
Cooking Directions
  1. Tear a sheet of filo in half length-wise.
  2. Put some walnut pieces in the sheet, and roll it around the walnuts.
  3. Do this for all 8 cigars.
  4. Arrange in a dish, and bake in 350 degree oven until golden brown. This shouldn't take too long.
  5. Remove from oven to cool.
  6. Meanwhile, bring the honey, citrus juice, and water to a boil and then simmer.
  7. Lightly pour the honey mixture over the cigars. Let cool.

September 11, 2013

Slow Cooker Apple Spice Cake

1 comment:
Yum

Another easy cake to make that requires absolutely no nasty frosting, icing, or the like. Just like the Slow Cooker Chocolate Cake, it's easy. It might come out a little denser and more like a bread pudding consistency. Enjoy!


Slow Cooker Apple Spice Cake

Yield: 8 servings
Ingredients
  • 3/4 cup all-purpose flour
  • 1/8 cup brown sugar
  • 1/2 teaspoon ground cinnamon
  • 1/4 teaspoon ground cloves
  • 1/8 teaspoon ground nutmeg
  • 1/4 teaspoon baking powder
  • 1/2 teaspoon baking soda
  • 1/8 teaspoon salt
  • 1 cup unsweetened applesauce
  • 1 egg
  • 2 tablespoons canola oil
Cooking Directions
  1. Spray crock of a 2 quart slow cooker with cooking spray.
  2. In a medium bowl, whisk the flour, brown sugar, spices, baking soda, baking powder, and salt.
  3. In a small bowl, combine the applesauce, oil, and egg. Beat until smooth.
  4. Add the applesauce mixture to the dry ingredients and beat until smooth and fluffy.
  5. Pour the cake batter into the prepared slow cooker.
  6. Cover and cook on HIGH until puffed and a cake tester inserted in the center comes out clean, about 2 1/2 hours.
  7. Turn the cooker off and let it stand with the lid on for 30 minutes to cool.
  8. To remove the cake, run a rubber spatula around the edge and lift it out.

July 31, 2013

Baklava

No comments:
Yum


Baklava, that super treat that goes for a crazy amount per piece. Well, you can probably get half this dish (well, close enough) for the same price by making it at home. Super easy, simple, and exceedingly delicious. Guests will rave for days about it. Enjoy!

Baklava

Yield: a whole lot of baklava!
Calories per serving: you don't wanna know
Ingredients
  • 1 cup sugar
  • 1 cup honey
  • 3/4 cup water
  • 1 tablespoon lemon juice
  • 2 teaspoons cinnamon
  • pinch cloves
  • 1 pound walnuts, or mix of any nut
  • 1 teaspoon cinnamon
  • 1/4 teaspoon salt
  • 1 stick unsalted butter
  • 1 pound phyllo dough, thawed
Cooking Directions
  1. Combine the sugar, honey, water, lemon juice, 2 teaspoons of cinnamon, and cloves in a medium saucepan. Cook over medium heat, stirring occasionally with a wooden spoon, until the sugar has dissolved. Reduce the heat to medium-low and cook until the syrup is slightly thickened, about 10 minutes. Let cool.
  2. Finely chop the nuts or pulse in a food processor. In a medium mixing bowl, combine the nuts, 1 teaspoon cinnamon, and salt and stir well to combine.
  3. Melt the butter.
  4. Using a pastry brush, lightly coat a 13 by 9-inch or 15 by 10-inch baking dish with some of the melted butter.
  5. Open the package of thawed phyllo and lay the thin sheets on a clean work surface. Measure the phyllo sheets; if the type you have purchased measures approximately the same size as the baking dish you are using, then proceed from here. If they are larger than your baking dish, use a sharp knife to cut the phyllo sheets approximately the same size as your baking dish. Keep any scraps for another use. Cover the sheets with a piece of plastic wrap and a lightly damp kitchen towel, as the sheets of phyllo dry out very quickly if left uncovered.
  6. Position rack in center of oven and preheat the oven to 350 degrees F.
  7. Place 1 of the sheets of phyllo in the bottom of the buttered baking dish and lightly brush with some of the melted butter. Repeat this procedure with 6 more sheets of phyllo, for a total of 7 layers. Measure about 3/4 cup of the nut mixture and spread the nut mixture evenly over the buttered phyllo sheets. Repeat with 7 more sheets of phyllo, buttering each layer as before, and top these sheets with another 3/4 cup of the nut mixture. Continue this layering process, buttering 7 sheets of phyllo and topping each 7 sheets with 3/4 cup of the nuts, until you have used all of the nut mixture. Layer any remaining sheets of phyllo on top, buttering between each layer, until all of the phyllo sheets have been used.
  8. Use a sharp knife to make 4 cuts lengthwise through the layered phyllo at 1 1/2 inch intervals. (You should end up with 5 lengthwise strips 1 1/2 inches wide.) Now use your knife to cut diagonally across the strips at 1 1/2-inch intervals to form diamond shapes. You should end up with approximately 36 diamond-shaped pieces of baklava in the baking dish.
  9. Bake the baklava until golden brown, about 40 minutes.
  10. Using oven mitts or pot holders, remove the baklava from the oven and set aside on a wire rack to cool for 5 minutes. Using a ladle or small measuring cup, slowly drizzle the cooled syrup over the warm baklava. Allow to stand several hours before serving.
  11. Adapted from Emeril.

May 31, 2013

Blueberry Muffins

No comments:
Yum

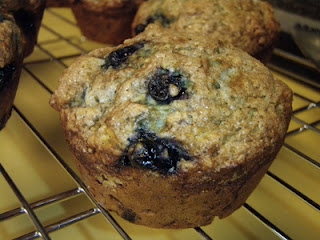
A couple years back, we spent a wonderful weekend at a B&B in New Hampshire. It was amazing, and one of the best B&Bs we've ever been to. One of the huge pluses was the breakfast, which was made completely from scratch every morning for us and that was different every day. Apparently, over the years others like us have requested the recipes because they were so good!

These blueberry muffins are bursting with flavor and were one of the many highlights of the trip. And when they're warm and fresh out of the oven, oh man, there's almost nothing better. Enjoy!


Blueberry Muffins

Yield: 16 muffins
Ingredients
  • 2 cups all-purpose flour
  • 1/3 cup sugar
  • 2 1/2 teaspoons baking powder
  • 1/2 teaspoon baking soda
  • 1 cup blueberries
  • 1 cup buttermilk
  • 1/3 cup canola oil
  • 1 egg
  • sugar
Cooking Directions
  1. Preheat 400F.
  2. In a large bowl, mix the dry ingredients. Add the blueberries and toss.
  3. In another bowl, mix the wet ingredients.
  4. Pour wet ingredients into dry ingredients and mix quickly with a fork, until flour disappears. Do not overmix. Batter should be lumpy.
  5. Spoon batter into greased muffin tins about 3/4 full.
  6. Sprinkle each muffin with a little sugar, up to 1/2 teaspoon.
  7. Bake 25 minutes or until golden brown.
  8. Serve warm.

April 01, 2013

Mint Chocolate Chip Frozen Yogurt

No comments:
Yum


Mint Chocolate Chip Frozen Yogurt

Total time: 1 hour
Yield: 8 servings
Ingredients
  • 2 teaspoons powdered gelatin
  • 1 3/4 cups skim milk
  • 1/2 cup sugar
  • ~18 ounces Greek yogurt
  • 1/2 teaspoon peppermint extract
  • 1 ounce dark chocolate, finely chopped
Cooking Directions
  1. In a large mixing bowl, sprinkle gelatin over 1/2 cup milk.
  2. In a small saucepan, heat the remaining 1 1/4 cups milk with sugar over medium-high heat, stirring frequently. When mixture is boiling, pour into bowl with milk and gelatin and stir until gelatin is completely dissolved.
  3. Stir yogurt into gelatin mixture. Whisk in peppermint extract.
  4. Freeze in an ice cream machine according to manufacturer's instructions.
  5. Toward the end of freezing time, add chocolate.
  6. Serve immediately or freeze to desired consistency.

February 27, 2013

Strawberry Summer Cake

No comments:
Yum

This is a delicious cake, perfect for the summer months when all we want to do is eat strawberries. It is light and goes well after a summer dinner. The addition of barley flour makes it even lighter and smoother. Don't worry if you don't have any though; it works just fine without.


If you have a regular pie pan, this will work fine. If you have a larger one or a deep dish one, either double or 1.5 times the recipe. Extra springiness! Enjoy!

Adapted from Smitten Kitchen.


Strawberry Summer Cake

Yield: 1 cake
Ingredients
  • 6 tablespoons (85 grams) unsalted butter, room temperature
  • 1.5 cups (188 grams) all-purpose flour (can swap half with barley flour)
  • 1.5 teaspoon baking powder
  • 1/2 teaspoon salt
  • 3/4 cup sugar
  • 2 tablespoons sugar
  • 1 egg
  • 1/2 cup milk
  • 1 teaspoon vanilla extract
  • 1 pound strawberries, halved
Cooking Directions
  1. Preheat oven to 350 degrees. Butter a pie pan.
  2. Whisk flour or flours, baking powder, and salt together in a small bowl.
  3. In a larger bowl, beat butter and 3/4 cup sugar until pale and fluffy with an electric mixer, about 3 minutes. Mix in egg, milk, and vanilla until just combined.
  4. Add dry mixture gradually, mixing until just smooth.
  5. Pour into prepared pie plate. Arrange strawberries on top of batter, as closely as possible in a single layer. Sprinkle remaining 2 tablespoons sugar over the strawberries.
  6. Bake cake for 10 minutes then reduce oven temperature to 325 degrees and bake cake until golden brown and a tester comes out free of wet batter, about 50 to 60 minutes.
  7. Let cool in pan on a rack.

October 10, 2012

Slow Cooker Chocolate Cake

No comments:
Yum

Wow! This is so cool is so many ways. Cake in a slow cooker. Delicious cake in a slow cooker. Moist, chocolatey, rich cake in a slow cooker. Simple and amazingly easy.


I don't know if I can get over how flabbergasted I am that this turned out so gorgeously well. So warm and dark and moist - absolutely the best cake I've ever made. One of the best parts is that it's a cake without frosting (because I generally despise frosting). OK, I'm going to just hand you the recipe now, both so that you can make it yourself and so I can grab another piece. Enjoy!


Slow Cooker Chocolate Cake

Yield: 8 servings
Ingredients
  • 1 cup white sugar
  • 3/4 cups and 2 tablespoons all-purpose flour
  • 1/4 cup and 2 tablespoons unsweetened cocoa powder
  • 3/4 teaspoon baking powder
  • 3/4 teaspoon baking soda
  • 1/2 teaspoon salt
  • 1 egg
  • 1/2 cup milk
  • 1/4 cup canola oil
  • 1 teaspoon vanilla
  • 1/2 cup boiling water
Cooking Directions
  1. Spray crock of a 2 quart slow cooker with cooking spray.
  2. In a medium bowl, whisk the sugar, flour, cocoa, baking soda, baking powder and salt. In a separate small bowl, whisk together the eggs, milk, oil, and vanilla until well combined. Whisk in the boiling water. Pour the wet ingredients into the dry and mix well.
  3. Pour the cake batter into the prepared slow cooker.
  4. Set slow cooker to low. Cook until cake has no wet spots on top and has pulled away from the sides of the crock, about 4 hours. DO NOT remove lid at any time, otherwise you'll lose moisture. Turn off slow cooker and allow cake to rest for 30 minutes before serving.

August 27, 2012

Pear Gruyere Pie

No comments:
Yum

Remember the TV show called Pushing Daisies? One of TV's biggest regrets is losing that show. The vivid color and vibrant fantasies that passed by on the screen was a highlight in entertainment.


In remembrance, or just because I've always wanted to make one of the delicious pies they're constantly baking and eating (they do work at The Pie Hole after all), the Pear Gruyere Pie was born - completely and utterly inspired by Chuck, who bakes the Gruyere into the crust. Enjoy!


Pear Gruyere Pie

Yield: 1 pie
Ingredients
  • Gruyere Crust
  • 2 1/2 cups all-purpose flour
  • 2 teaspoon salt
  • 2 sticks unsalted butter
  • 1/3 cup ice water
  • 1/2 cup shredded Gruyere cheese
  • Pear Filling
  • 1/4 cup brown sugar
  • 1/4 cup white sugar
  • 3 tablespoons all-purpose flour
  • 1/4 teaspoon salt
  • 1 teaspoon ground cinnamon
  • 1/4 teaspoon nutmeg
  • 5 cups pear, peeled and sliced
  • 1 tablespoon unsalted butter
  • 1 tablespoon lemon juice
Cooking Directions
  1. Combine the flour and salt in a bowl. Dice the butter into 1/4 inch pieces. Place butter and the flour in a large zip lock bag, seal and roll over with a rolling pin until the butter is combined. Place the bag in the freezer for at least 30 minutes.
  2. Pour the ingredients from the bag into a chilled mixing bowl and work together with a fork until the mixture becomes pebbly. Gradually drizzle the ice water over the mixture, blending with the fork. Add more water if necessary add a tablespoon at a time, until you achieve the right consistency.
  3. Form two discs out of the dough, working each in your palm. Wrap them each tightly with saran wrap and refrigerate.
  4. Combine sugar, flour, salt, cinnamon, and nutmeg in mixing bowl.
  5. Arrange pears in layers in a 9 inch pan on top of one of the crusts, sprinkling sugar mixture over each layer. Dot with butter. Sprinkle with lemon juice. Roll out remaining dough; cut slits for escape of steam. Moisten rim of bottom crust. Place top crust over filling. Fold edge under bottom crust, crimping to seal.
  6. Bake at 450 degrees F (230 degrees C) for 10 minutes. Sprinkle Gruyere over the top. Reduce temperature to 350 degrees F (175 degrees C), and bake for an additional 35 to 40 minutes.

March 17, 2012

(B)Elated Irish Soda Bread (3 Variations)

No comments:
Yum


Belated Elated Irish Soda Bread. Long overdue but finally making its way to your very eyes is the much-anticipated, often-imitated-but-never-duplicated Irish soda bread.

There are three variations we have here:
- The first is Irish-Irish soda bread - like they invented in Ireland.
- The second is American-Irish soda bread - like the kind found in America with the raisins.
- The third is a mix between the two - no raisins but with a bit of egg enough to change the flavor.


Maybe (at this late juncture) you're craving a wee bit o' Irish, going through the withdrawls of St. Patty's Day. If you're like me, you most certainly are (except this feeling lasts all year), and hopefully, these wee treats will brighten your day. Enjoy!

December 23, 2011

Basic Fudge - no chocolate

2 comments:
Yum

A basic fudge. I wanted fudge without chocolate, so I used my Mom's World Famous Fudge and just took out the chocolate. I love to experiment in the kitchen, and we had a little leftover evaporated milk, so I proportioned everything down. It came out like an English-style fudge, complete with a crumblier texture and slight vanilla taste.

It looks beautiful and sets super quickly. I think the best thing about this though is that it can be used as a base for any fudge flavoring you wish. Enjoy!

December 21, 2011

Strawberry Fudge

2 comments:
Yum

First off, Merry Christmas, all.

I searched high and low for a Strawberry Fudge recipe yesterday. I asked on Twitter and Facebook and got only a few responses which wouldn't work. Finally, I found a pineapple fudge recipe which seemed to work for some people. So I substituted one cup of crushed strawberries for one cup of crushed pineapple. Yeah, I know - maybe it wouldn't set properly (the hardest part of experimenting with fudge), but I had to try because darn it, I wanted some strawberry fudge! Anyway, I put it in a pan to set, let it rest overnight, flipped it out of the pan onto parchment paper in whatever shapes and pieces broke apart, and voila! it's set.

Next time I think I'll toy with the liquid ratio to either make it creamier or set more easily. Anywho.

This is seriously strawberry-y. Delicious like the best strawberry-flavored jelly, jam, preserves, marmalade, etc that you've ever had. Just don't expect it to be as creamy as regular fudge. It's more like an English-style fudge - crumbly, sugary, mmm. Enjoy!

December 19, 2011

Divinity - no chocolate, no dairy, all yum - without Marshmallow

1 comment:
Yum

Divinity, a dairy-free, chocolate-free, white-wonderland of almost-marshmallow creme-like flavor and consistency is here! I wanted something that was sweet and full of holiday cheer like our famous fudge, and divinity is the answer. It comes out addicting yet not over-the-top sweet.


And, I believe, depending on how long you blend the mixture over the egg whites, you can adjust the thickness and consistency of the divinity. So it can either be like marshmallow fluff or firmer like a fudgy block.

Pst, don't tell anybody, but it just might be even better than the fudge. Enjoy!

December 16, 2011

Mom's World Famous Fudge

1 comment:
Yum

The Best Fudge - ever! Trust me on this one. My grandma passed this on to my mom, and it has been given out around the holidays for years and years. Now, we're passing the recipe on to you. It's fudge, so forgot about it being light and airy, blah blah blah. This is pure decadence - soft, melts in your mouth, sugar-rushes your heart a second closer to sweet oblivion.

There is a trick to this fudge, so pay attention. Constant, unwavering stirring. Never stop. Pay attention. And you'll give your family and friends another reason to love you (or hate you) this holiday season. Enjoy!

December 12, 2011

Tofu Pumpkin Pie

No comments:
Yum

This is by far the second best pumpkin pie I've ever had, ever. Only my mom's pumpkin pie beats it, and though she says it's not that difficult to make, she always spices it just right. This one, however, comes pretty darn close.


I love these kinds of pies. Pies that are full of healthy goodness that won't make you feel like you've committed some kind of sin.

This one is even better because it uses tofu instead of any kind of dairy to perk it up. And you can't taste the tofu whatsoever. No one will ever know. Enjoy!

November 02, 2011

Homemade Cannoli

No comments:
Yum

A chocolate chip cannoli could be one of the easiest Italian desserts you'll ever make. Well, as long as you forget about making the cannoli shells yourself. Those things can be a huge pain, and they are only worth doing at home if you're going to make more than 20. Since most of us aren't, and we only want some of that sweet ricotta filling anyway in a fun, easy-to-hold shell, it's just better to buy a couple cannoli shells from a local bakery or supermarket.

The secret to a great filling is in the simplicity and ratio. All you really need is ricotta and powdered sugar. Powdered sugar is essential. You won't get the right texture without it. There are some other fun additions you can make like amaretto or orange-flavored liqueur, but be sure to adjust for the added 1 tsp - 1 Tbsp of liquid so it's not too runny. Now on to the cannoli!

Ingredients

2 cannoli shells
1 cup ricotta cheese
1/4 cup powdered sugar
handful of chocolate chips

Directions

Mix together ricotta and powdered sugar. Start with the above ratio and adjust to your personal tastes.

Spoon (or pipe) into shells, filling all the way through.

Sprinkle chocolate chips on the outside.

Grab a cappuccino and enjoy!

October 24, 2011

Challah Bread: 4 Ways

2 comments:
Yum

Doesn't that just look delicious? 4 ways of doing light, fluffy, eggy challah bread. All of these recipes are from the same basic Challah Bread recipe from a while back.


Above are the two sweet varieties: raisin and chocolate chip. I'll let you guess which is which. Personally, I liked the raisin one more, and a certain someone really liked the chocolate chip challah bread. In either case, I would add more raisins and chips.


The two above are the savory ones. A plain one like we made before and a rosemary and olive oil one with sea salt on top. Out of all four the rosemary one was my favorite. It went with everything at any time of day. It was perfect.

Use the basic recipe below for each loaf and follow the substitutions and extra ingredients for each type.

Raisin:
Add 1/4-1/2 cup soaked raisins when kneading during step 3.

Chocolate Chip:
Add 1/4-1/2 cup chips when kneading during step 3.

Rosemary Olive Oil:
Use olive oil instead of canola oil. Add 1-2 tablespoons dried rosemary when kneading during step 3. Sprinkle extra sea salt or kosher salt on top before baking.

Yields 1 loaf

Ingredients

3/4 tablespoons active dry yeast
1/2 tablespoon plus 1/4 cup sugar
1/4 cup canola oil, plus more for greasing the bowl
3 large eggs
1/2 tablespoon salt
4 cups all-purpose flour
7/8 cup water

Directions

1. In a large bowl, dissolve yeast and 1/2 tablespoon sugar in the lukewarm water.

2. Whisk oil into yeast, then beat in 2 eggs, one at a time, with remaining sugar and salt. Gradually add flour 1/2 cup at a time. When dough holds together, it is ready for kneading (you may not end up using all the flour).

3. Turn dough onto a floured surface and knead until smooth. Grease the bowl, then return dough. Cover with plastic wrap, and let rise in a warm place for 1 hour, until almost doubled in size. Punch down dough, cover and let rise again in a warm place for another 30 minutes.

4. Form the dough into 6 balls. With your hands, roll each ball into a strand about 12 inches long and 1 1/2 inches wide. Place the 6 in a row, parallel to one another. Pinch the tops of all 6 strands together. Then:

Move the outside right strand over 2 strands.
Then take the second strand from the left and move it to the far right.
Take the outside left strand and move it over 2.
Move the second strand from the right over to the far left.
Start over with the outside right strand.

Continue this until all strands are braided, then tuck ends underneath. Place braided loaf on a greased cookie sheet with at least 2 inches in between.

5. Beat remaining egg and brush it on loaf. Let rise another hour.

6. If baking immediately, preheat oven to 375 degrees and brush loaf again.

7. Bake in the middle of oven for 30 to 40 minutes, or until golden. Cool loaves on a rack before enjoying.

October 18, 2011

Yellow Watermelon

No comments:
Yum

Local food is kind of amazing, isn't it? We took part in a CSA for the first time this year, and the amount and variety of fruits and vegetables have been amazing. I've had some things through this experience that I've never had before. One of them is that beautiful yellow watermelon above. Perhaps the juiciest, most flavorful watermelon I've ever eaten.

Was it because it was local? Fresh? Yellow? I like to think it's a mix of all those things, and perhaps the extra care the farmer put into it. We also had the best cantaloupe because of this CSA. Imagine the greatest cantaloupe you've ever had. Now stop. This cantaloupe was better than that. Guaranteed. It was like eating cantaloupe for the first time, nothing else before or since has seemed to have any flavor.

Give local food and/or CSAs a try. You'll probably love it.