January 02, 2023

Okara Patties

No comments:
Yum

Okara is a versatile ingredient that can be used in a variety of dishes. Here is a simple recipe for Okara Patties that makes for a tasty and healthy vegetarian option.

Ingredients:

  • 1 cup okara
  • 1/2 cup grated carrots
  • 1/2 cup chopped green onions
  • 1/4 cup chopped fresh parsley
  • 2 cloves garlic, minced
  • 1 teaspoon ground cumin
  • 1/2 teaspoon ground coriander
  • Salt and pepper to taste
  • 1/4 cup whole wheat (or any) flour
  • 1/4 cup breadcrumbs (or similar dry ingredient)
  • Olive oil for frying

Instructions:

  1. In a large mixing bowl, combine the okara, carrots, green onions, parsley, garlic, cumin, coriander, salt, and pepper. Mix well to combine.
  2. Add the flour and breadcrumbs and mix until the mixture comes together and forms a dough.
  3. Divide the dough into 8 equal-sized balls and flatten them into patties.
  4. Heat a large frying pan over medium heat and add enough olive oil to coat the bottom of the pan.
  5. Fry the patties for 3-4 minutes on each side, or until golden brown and crispy.
  6. Serve the patties with a side of your choice, such as a mixed green salad or roasted vegetables.

This recipe makes 8 okara patties that are perfect for a light lunch or dinner. You can also experiment with different seasonings and herbs to give the patties a unique flavor. Enjoy!

December 09, 2022

Okara Stir-Fry

No comments:
Yum

Okara is a byproduct of the soy milk-making process. It is a high-protein, high-fiber ingredient that can be used in a variety of dishes. Here is a new recipe that uses okara:

Okara and Mushroom Stir-Fry

Ingredients:

  • 1 cup okara, fresh or frozen
  • 1 cup sliced mushrooms (any kind)
  • 1/2 cup diced onion
  • 1/2 cup diced bell pepper (any color)
  • 1 clove garlic, minced
  • 1 tablespoon oil
  • 1 tablespoon soy sauce
  • Salt and pepper, to taste

Instructions:

  1. In a large frying pan or wok, heat the oil over medium-high heat.

  2. Add the onion, bell pepper, and garlic to the pan and stir-fry until the vegetables are tender.

  3. Add the mushrooms to the pan and continue stir-frying for another minute or two, until the mushrooms are softened.

  4. Add the okara to the pan and stir-fry for another minute or two, until it is heated through.

  5. Add the soy sauce and stir to combine.

  6. Season with salt and pepper to taste.

  7. Serve the stir-fry over rice, noodles, or your favorite grain.

This okara and mushroom stir-fry is a simple and delicious way to use up this versatile ingredient. The protein and fiber in the okara make it a healthy and satisfying meal. Enjoy!

February 05, 2016

Pressure Cooker Thai Coconut Curry

1 comment:
Yum
The beauty of this recipe is that it is 1) very quick, and 2) very forgiving. What that means is that you can play around with the veggies a great deal. Want sweet potatoes instead of potatoes? Done. Want winter squash instead of that? Done. Want to throw in green beans or eggplant or mushrooms? Go or it. Just don't overload your pressure cooker, and you'll be fine. Enjoy!


Pressure Cooker Thai Coconut Curry

Yield: 6 servings
Ingredients
  • 2 tablespoons oil
  • 3 cloves garlic, crushed
  • optional: 3 Thai green chilis
  • 1/4 teaspoon ground coriander
  • 1/4 teaspoon ground cumin
  • 2 teaspoons Thai curry cowder
  • OR 2 tablespoons Thai curry paste
  • 1 14-oz can coconut milk
  • 6 cups potatoes, cubed
  • 4 carrots, sliced 1/2-inch thick
  • 1-2 lbs chicken pieces
  • Kosher salt
  • 1 tablespoon fish sauce
  • 4 oz (4 packed cups) spinach
  • 1/2 cup loosely packed fresh herbs
  • fresh black pepper
  • 1/4 - 1/2 cup cooked rice or grain
  • 6 lime wedges
Cooking Directions
  1. Heat oil in a pressure cooker over medium-high heat until shimmering. Add garlic, chilies (if using), ginger, coriander, and cumin and cook, stirring, until aromatic, about 1 minute. Add curry powder or paste and cook, stirring, until it has darkened slightly, about 2 or 3 minutes.
  2. Add coconut milk, stir, bring to a simmer, and cook for 1 minute. Sprinkle salt on chicken pieces. Add half the potatoes and carrots. Add chicken and top with the remaining potatoes and carrots. Sprinkle on a little salt. Seal pressure cooker and cook on high pressure for 20 minutes.
  3. Release pressure with the quick-release method, remove lid, and stir in the fish sauce, spinach, and 3/4 of any fresh herbs. Season with salt and pepper to taste. Ladle the stew into serving bowls and place remaining herbs on top. Serve with rice (or grain) and lime wedges.

January 15, 2016

Spinach Souffle

No comments:
Yum
Maybe this is a souffle, maybe it isn't. I'm still unclear. One thing for certain is that it is delicious, nutritious, and fun to boot. Simple, easy, and foolproof. Play around with the spices, amount of cheese, and other leafy greens. Anything light will work. Enjoy!


Spinach Souffle

Yield: 6 servings
Ingredients
  • 10 eggs
  • 2 tablespoons garlic, diced
  • 5 tablespoons parmesan
  • 2 tablespoons butter
  • 5 ounces spinach
  • 1/4 teaspoon salt
  • 1/4 teaspoon pepper
Cooking Directions
  1. Steam or microwave the spinach for 2 minutes. Drain.
  2. Preheat the oven to 375 F.
  3. In a loaf pan, whisk the eggs until slightly frothy.
  4. Whisk in the salt, pepper, and any other spices, 3 ounces of parmesan, and the garlic.
  5. Melted the butter and mix into the eggs.
  6. Mix in the spinach.
  7. Sprinkle the remaining parmesan on the top.
  8. Bake for 30 minutes, until browned on top. Serve immediately, otherwise the souffle will start to deflate.

January 01, 2016

Fresh Semolina Egg Pasta

No comments:
Yum
Fresh pasta is so easy with the right machine. By hand it can be laborious and tiresome. But with a machine roller and cutter (via KitchenAid), it is a relative breeze. Either way it takes a long time to mix the eggs into the flour though, so be prepared. Enjoy!

Fresh Semolina Egg Pasta

Yield: 16 servings
Ingredients
  • 2 cups all-purpose flour
  • 2 cups semolina flour
  • 6 eggs
  • 2 tablespoons olive oil
  • 1 pinch salt
Cooking Directions
  1. Thoroughly sift together all-purpose flour, semolina flour, and pinch of salt. On a clean surface, make a deep well in center of the flour.
  2. Crack the eggs into the well and add the olive oil.
  3. Whisk eggs very gently with a fork, gradually incorporating flour from the sides of the well. This will take a long time! When mixture becomes too thick to mix with a fork, begin kneading with your hands.
  4. Knead dough for 8 to 12 minutes, until it is smooth and supple. Dust dough and work surface with either flour as needed to keep dough from becoming sticky.
  5. Wrap dough tightly in plastic and allow it to rest at room temperature for at least 30 minutes.
  6. Roll out dough with a pasta machine or a rolling pin to desired thickness. Cut into your favorite style of noodle. Bring water to a boil in a large pot. Cook pasta until tender but not mushy, 2 to 6 minutes, based on thickness. Drain immediately and toss with your favorite sauce.

December 04, 2015

Pressure Cooker Split Pea Soup

No comments:
Yum
A delicious recipe for a vegetarian split pea soup made in a pressure cooker. Simple, quick, and effective. Just how I like it. Enjoy!


Pressure Cooker Split Pea Soup

Yield: 6-8 servings
Ingredients
  • 1 lb split peas, soaked and rinsed
  • 1 medium onion, diced
  • 1 celery, diced
  • OR 1 tablespoon dried celery leaf
  • 1 tablespoon oil
  • 2 bay leaves
  • 1 teaspoon salt
  • 6 cups water
Cooking Directions
  1. Add everything to the pressure cooker. Mix well.
  2. Close and lock the lid.
  3. Cook on high pressure for 5 minutes.
  4. Let cool via the natural release method off the burner.
  5. Open the pressure cooker, remove the bay leaves, mix, and serve.

November 20, 2015

Garlicky Roasted Butternut Squash

No comments:
Yum
This is sooo simple. And seriously delicious. The hardest part is cutting through the dang butternut squash! It's always my favorite holiday dish. Enjoy!

Garlicky Roasted Butternut Squash

Yield: 8-12 servings
Ingredients
  • 1 butternut squash, peeled and cut into 1-inch cubes
  • 1 tablespoon olive oil
  • 1 tablespoon dried parsley
  • 2 garlic cloves, minced
  • 1 teaspoon salt
  • 1/2 teaspoon pepper
Cooking Directions
  1. In a large bowl, combine the parsley, oil, garlic, salt, and pepper. Add squash and toss to coat.
  2. Transfer to an ungreased baking sheet. Bake at 350 degrees F for 45-60 minutes or until squash is just tender and browned on the bottom.

September 25, 2015

Pressure Cooker Carnitas

No comments:
Yum
Delicious carnitas made so quickly and easily in a pressure cooker. It takes almost as long to cut up the pork into cubes as it does to cook it in the pressure cooker. I don't think I'll ever go back to slow cooking again. Just amazing. Enjoy!

Pressure Cooker Carnitas

Yield: 12-16 servings
Ingredients
  • 1 4-5 lbs. pork shoulder, trimmed of excess fat (outside only), cut into 1-1.5 inch "cubes"
  • 1 medium onion, diced
  • 2 tablespoons garlic powder
  • 1 tablespoon salt
  • 1 teaspoon chili powder
  • 1.5 teaspoons ground cumin
  • 1 teaspoon dried oregano
  • 1/2 teaspoon ground coriander
  • 1/2 teaspoon ground cinnamon
  • 1.5 cups water
Cooking Directions
  1. Combine dry ingredients.
  2. Heat stove top pressure cooker over medium high heat. Brown meat on most sides, if possible.
  3. Add spices and mix.
  4. Add onions and mix.
  5. Add water and mix. Add the bone (from the pork shoulder) and push to the bottom.
  6. Cook at medium to medium high pressure for 45 minutes.
  7. Release pressure via the quick release method.
  8. If you want it crispy, continue below. Otherwise, serve immediately.
  9. Remove pork. Uncover and cook one hour to reduce cooking liquid.
  10. Set oven to broil.
  11. Transfer pork and cooking liquid to large baking sheet.
  12. Pull apart larger pieces with two forks, and then press pork into roughly uniform thickness.
  13. Place under broiler for 2-5 minutes until browned. Use a large, flat spatula to flip the pork and brown again for 2-5 minutes more.

May 22, 2015

Banana Blossom Stir Fry

No comments:
Yum
A meal my wife made up on the fly (winged it, as she likes to say). Once you've gone through the long, long, long processing of the banana blossom, it's pretty easy. That info you can find here.

The banana blossom gives an almost coconut-like taste to the dish. It's texture is reminiscent of green onions, perhaps. Not hard, slightly crunchy. Plus, it's just fun to try a new ingredient! Enjoy!


Banana Blossom Stir Fry

Yield: 4 servings
Ingredients
  • 1 banana blossom, prepared
  • 2 tablespoons canola oil
  • 1 onion, chopped
  • 1 carrot, peeled and chopped
  • 1/4 teaspoon turmeric
  • 2 eggs
  • 4 garlic cloves, minced
  • 1 cup cooked rice, dry
Cooking Directions
  1. Boil the prepped banana blossom for a minute. Drain.
  2. Heat the canola oil, stir fry the onion and carrot, then the banana blossom a few minutes later. Add turmeric.
  3. Add the cooked rice until heated through. Add whatever sauces and seasonings you like. Set entire mixture aside.
  4. Scramble the eggs, add the garlic, then add the rice mixture back to the pan. Stir well and enjoy.

May 01, 2015

Sourdough Pizza

No comments:
Yum
Here is our sourdough take on our classic Thin Crust Pizza on a pizza steel. If you like a little bit of that sourdough favor (but not a full-blown San Francisco punch), you're going to be into this. It's a little different and good in its own way. Let us know how it turned out for you. Enjoy!


Thin Crust Pizza on Steel

Yield: 3 pizzas
Ingredients
  • 205 g lukewarm water
  • 1 cup (183 g) sourdough starter
  • 1/2 tablespoon kosher salt
  • 1/8 cup olive oil
  • 345 g all-purpose flour
Cooking Directions
  1. Mix the starter, salt, and olive oil with the water in a non-airtight lidded container.
  2. Mix in the flour without kneading, using a spoon.
  3. Cover and allow to rest at room temperature until dough rises and flattens. This could take longer because of the sourdough.
  4. At this point, you can store it in the fridge for up to a week or dust the top with flour and cut into three pieces. The other pieces may be wrapped tightly with plastic wrap and stored in the freezer for several months.
  5. Preheat oven to its highest temperature and place baking steel or stone on the middle or lowest rack. Let preheat for 20-40 minutes.
  6. Shape dough into a ball by stretching the surface around to the bottom on all four sides. Do this minimally.
  7. Flatten with your hands on a well-floured surface. Get the dough to 1/8 inch thick. Use a floured rolling pin if needed. The dough will spring back some, so you may need to stretch it further than you think of stretch it again. Once stretched and relaxed, place onto a cornmeal-covered pizza peel.
  8. Place your toppings on the dough. Be minimalistic.
  9. Slide the pizza directly onto the steel or stone. Pizza may be done in as little as 4 minutes, so check to make sure it's not overcooking.
  10. Allow to cool for a minute on a rack to allow the cheese to set.

April 24, 2015

Vietnamese Ham (Cha Lua)

No comments:
Yum
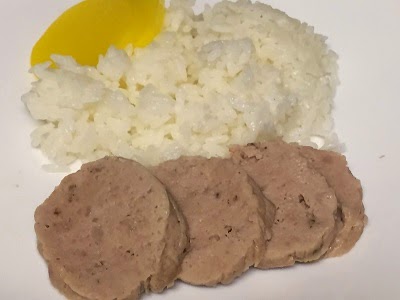
Vietnamese ham, also know as Vietnamese pork roll or cha lua, is one of the simpler sausages to make. All you need is some ground pork, some seasoning, and baking powder. The baking powder and tapioca flour add the desired bounciness you're looking for. In fact, some chefs bounce the meat on the counter to make sure it's cooked. If it bounces, it's done. To get it just like you would find in a grocery store or restaurant, use the ingredients below. Otherwise, go crazy and mix it up!

This goes particularly well with some stir-fried veggies and rice, in soup, or in spring rolls. The leftovers freeze quite well too. Enjoy!

Vietnamese Ham (Cha Lua)

Yield: 8 servings
Ingredients
  • 2 lbs ground pork
  • 2 tablespoons fish sauce
  • 1 cup water
  • 2 teaspoons baking powder
  • 2 tablespoons tapioca flour
Cooking Directions
  1. In a large bowl, add the pork and fish sauce and mix.
  2. In a separate bowl, add the water, tapioca flour, and baking powder and mix.
  3. Fold this into the pork. It will be quite moist.
  4. Cover and allow to rest at least 6 hrs in the fridge - preferably overnight.
  5. When ready to cook, grind the mixture in small batches in a food processor. It’s very important to keep the mixture cold, so only work in small batches and keep remainder in the fridge. The texture should be very smooth.
  6. You can either wrap it up in banana leaf or in plastic wrap. Wrapping it in plastic wrap is much faster and easier. The meat will rise and expand a bit when cooked too.
  7. Steam for about 20-25 minutes.

April 17, 2015

Stuffed Roast Pork Loin

No comments:
Yum
This one's a little tricky and takes a little time, yet the roast that emerges is savory with a not-too-sweet stuffing. It's huge and well worth it. It also works extremely well without the stuffing. The brine is just that delicious. Enjoy!

Stuffed Roast Pork Loin

Yield: 8-10 servings
Ingredients
  • 2 quarts pork brine
  • 2.5 pound pork loin roast
  • 1/2 cup fennel, cut into 1 1/2 by 1/2 inch pieces
  • canola oil
  • 1 teaspoon garlic, minced
  • 1 tablespoon onion, chopped
  • 1 cup fig and balsamic jam
  • 1/4 cup stock
  • 1/4 teaspoon dried thyme
  • kosher salt and fresh black pepper
  • Pork Brine
  • 1/4 cup honey
  • 12 bay leaves
  • 3 tablespoons rosemary
  • 1/4 teaspoon dried thyme
  • 1 teaspoon dried parsley
  • 1/2 cup garlic cloves, crushed, skin on
  • 2 tablespoons black peppercorns
  • 1 cup kosher salt
  • 8 cups water
  • Fig and Balsamic Jam
  • 0.8 pounds figs, preferably Black Mission or Kadota, stems removed and coarsely chopped
  • 1/2 cup sugar
  • 1/4 cup balsamic vinegar
  • 1/2 teaspoon black peppercorns, tied in a sachet
  • lemon juice
Cooking Directions
    Pork Brine
  1. Combine all ingredients in a large pot and bring to a boil. Boil for 1 minute, stirring to dissolve salt. Remove from heat and cool completely, then chill before using.
  2. Fig and Balsamic Jam
  3. Combine figs, sugar, balsamic vinegar, and sachet in a large saucepan. Bring to a simmer over medium-high heat, then lower to maintain a gentle simmer. Cook, stirring to break up large chunks of fig, until the jam reaches 215 F to 220 F. Remove from heat and remove the sachet. Add lemon juice to taste. Let cool to room temperature.
  4. Pork Roast
  5. Pour the brine into a large container and add the pork. Refrigerate for 10 hours but no longer.
  6. Remove pork and rinse. Pat dry or let air dry. Discard brine.
  7. With a long knife, make a horizontal lengthwise cut all the way through the center of the loin. Work from both ends. Then make a vertical cut to form a cross.
  8. Set a rack over a baking sheet and line with paper towels.
  9. Heat a small amount of canola oil in a medium pan over medium heat, cook fennel for 2-3 minutes until just tender. Add garlic and shallot and cook for 1 minute. Stir in the jam until warm, then add stock, thyme, and salt and pepper to taste. Stir until combined. Transfer to a bowl and let it cool completely.
  10. Preheat the oven to 350 F. Put a roasting rack in a roasting pan and put it in the oven.
  11. Meanwhile, use your fingers to widen the cavity in the meat. Stuff the pork loin from both ends all the way to the center. Tie the loin with kitchen twine.
  12. Season the loin with salt and pepper all over. Heat some more canola oil in a large pan over medium-high heat until smoking. Brown the loin on all sides, 2-3 minutes per side.
  13. Transfer the pork to the roasting pan and roast for 30-40 minutes, or until the pork is 135 F to 140 F. Remove from the oven and let it rest in a warm spot for 30 minutes.
  14. Remove the string and cut into 1/4 inch slices. Plate and sprinkle with coarse salt.

April 10, 2015

Perfect Collard Greens

No comments:
Yum
These are the perfect basic collard greens. As is, they're vegan. From here, you can fancy them up however you like. They go great with some mac and cheese. Enjoy!

Perfect Collard Greens

Yield: 6 servings
Ingredients
  • 1 large bunch collard greens
  • 1 tablespoon butter
  • 1 tablespoon salt
  • 1 tablespoon black pepper
  • 1 tablespoon garlic powder
  • 1 tablespoon hot sauce
Cooking Directions
  1. In a large pot, bring 3 quarts of water to a boil and add seasoning and hot sauce. Reduce heat to medium.
  2. Wash the collard greens thoroughly. Slice into 1/2 to 1-inch thick slices.
  3. Place greens in pot and add butter. Cook for 45 to 60 minutes, stirring occasionally. When done, taste and adjust seasoning.

April 03, 2015

Sinful Baked Mac and Cheese

No comments:
Yum
Deliciously sinful baked mac and cheese is a luxury. A luxury in that it's so rich, you should probably only have a small portion and have a large salad and steamed veggies with it. It's not, however, a luxury in time or cost. Extremely easy and simple, this will fulfill any mac and cheese craving you're likely to have for a long time. Enjoy!


Sinful Baked Mac and Cheese

Yield: 8-12 servings
Ingredients
  • 4 tablespoons unsalted butter
  • 2 3/4 cups milk
  • 1/4 cup flour
  • 1/8 teaspoon nutmeg
  • 1/4 teaspoon black pepper
  • 1/4 teaspoon cayenne pepper
  • 2 cups (8 ounces) sharp white cheddar cheese, grated
  • 1 cup (4 ounces) Gruyere, grated OR
  • 1/2 cup parmesan, grated
  • 1/2 pound macaroni or similar
Cooking Directions
  1. Preheat oven to 375 F. Butter a 3-quart casserole dish; set aside.
  2. Warm the milk in a medium saucepan over medium heat.
  3. Melt the remaining butter in a large skillet over medium heat. When it bubbles, add the flour. Cook, stirring, for 1 minute.
  4. While whisking, slowly pour in the hot milk a little at a time to keep the mixture smooth. Continue whisking constantly until the mixture bubbles and becomes thick, 8 to 12 minutes.
  5. Remove the pan from the heat. Stir in nutmeg, black pepper, cayenne pepper, 1 1/2 cups cheddar cheese, and 3/4 cups Gruyère (or 1/4 cup parmesan). Set the cheese sauce aside.
  6. Bring a large pot of salted water to a boil. Cook the macaroni until the outside of is cooked and the inside is underdone, 2 to 3 minutes. Rinse under cold water and drain the macaroni. Stir the macaroni into the cheese sauce.
  7. Pour the mixture into the baking dish. Sprinkle the remaining cheeses over the top. Bake until golden brown, about 30 minutes. Transfer the dish to a wire rack for 5 minutes to set, then serve.

March 27, 2015

Healthy Granola Bars

No comments:
Yum
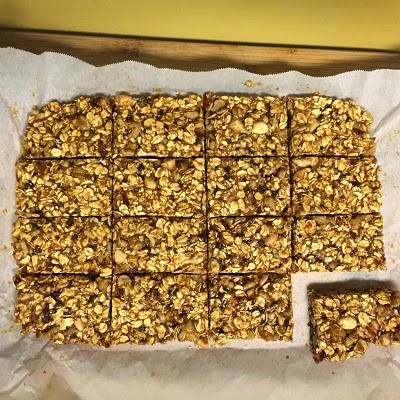
Most often, granola bars are laden with lots of extra sugar and less-than-good-for-you ingredients. The "healthy" part of them all but disappears at that point. Sure, there are a few good ones out there now, but they can be expensive. For the same price you can make an entire batch or more.

The best part is that the recipe below can be tweaked to your liking. Don't like dates? Sub in raisins. Want to cut back on the honey? Go for it. Got a thing against peanut butter? Well then you're crazy and I just can't help you. Or use a nut/seed butter. The possibilities are endless! Enjoy!

Healthy Granola Bars

Yield: 16 servings
Ingredients
  • 1 cup dates
  • 1/4 cup honey
  • 1/4 cup peanut butter
  • 1/2 cup walnuts, roasted
  • 1/2 cup peanuts, roasted
  • 1 1/2 cups rolled oats
Cooking Directions
  1. Soak dates in water for 10 minutes.
  2. Process dates in a food processor until small bits remain (about 1 minute). It should be able to roll into a ball, with a dough consistency.
  3. Toast the oats at 350 F in the oven until slightly golden brown, about 15 minutes.
  4. Place oats, nuts, and dates in a bowl.
  5. Warm honey and peanut butter in a small pan over low heat. Stir and pour over oat mixture and then mix, breaking up the dates.
  6. Once mixed, transfer to an 8x8 or 7x11 dish lined with parchment paper.
  7. Press down until uniformly flat. Cover with parchment paper, and let set in the fridge for 15-20 minutes to harden.
  8. Remove bars from pan and chop into 16 bars. Store in an airtight container in the fridge or wrapped up in the freezer.

March 20, 2015

Flourless chocolate cake

No comments:
Yum
Flourless chocolate cake is one of those delicacies that seems difficult but is not. There are only a few ingredients, and the hardest part is letting a mixer beat the egg whites into stiff peaks. If you're gluten free, then you can have your cake and eat it too! Unless you eat the whole thing at once. And top is off with some fruit, whipped cream, and/or a caramel sauce. When it's this good, this becomes a judgement-free zone. Enjoy!

Flourless chocolate cake

Yield: 16 servings
Ingredients
  • 1 lb bittersweet chocolate, chopped into small pieces
  • 1 stick unsalted butter
  • 9 eggs, separated
  • 3/4 cup sugar
  • 1 teaspoon vanilla extract
Cooking Directions
  1. Preheat the oven to 375 F.
  2. Butter a springform pan.
  3. Put the chocolate and butter into a stainless steel mixing bowl and heat over (but not touching) about 1 inch of simmering water until melted, stirring occasionally.
  4. Meanwhile, whisk the egg yolks with the sugar and vanilla in a mixing bowl until pale yellow in color.
  5. Whisk the chocolate mixture into the egg yolk mixture.
  6. Beat the egg whites in a mixing bowl until stiff peaks form and fold into the chocolate mixture.
  7. Pour into the cake pan and bake until the cake is set and a toothpick inserted into the cake comes out with moist crumbs clinging to it, about 20 minutes. Let stand at least 10 minutes, then remove sides of pan.

March 13, 2015

Red wine braised short ribs

No comments:
Yum
This is such a powerful yet simple dish. The braising really tenderizes and brings out the flavor of the short ribs, like it does to so many other delicious dishes (e.g. Osso Buco). Serve this on its own, with potatoes, polenta, or, as pictured, risotto. Enjoy!

Red wine braised short ribs

Yield: 1 piece per serving
Ingredients
  • 3 pounds boneless beef short ribs
  • seasoned flour
  • 4 tablespoons olive oil
  • 2 onions, diced
  • 4 carrots, diced
  • 2 celery ribs, diced
  • 8 garlic cloves, minced
  • 1 cup red wine
  • 1 14 oz. can plum tomatoes, broken up
  • 2 cups chicken stock
  • 1 tablespoon fresh oregano, chopped
  • 2 teaspoons dried herbs de Provence
  • salt and pepper
Cooking Directions
  1. Preheat the oven to 400 F.
  2. Coat the shortribs with seasoned flour and brown in the oil.
  3. Remove from the pan and add the onion, celery, mushrooms, garlic, and carrots.
  4. Sauté another 5 minutes, add the wine, and reduce by half.
  5. Add the tomatoes, stock, and herbs. Cover and braise covered in the oven for 1 hour at 400 degrees then reduce the heat to 350 F, uncover, and continue cooking for another hour or until tender.
  6. Season with salt and pepper to taste.

March 06, 2015

Roast asparagus salad with baked goat cheese

No comments:
Yum
This is a wonderful, fresh, and flavorful salad. Rich but not too rich. The asparagus gets tender, the dressing is outstanding, and the goat cheese is crispy yet smooth. Serve it as a starter or just as a light meal. Enjoy!


Roast asparagus salad with baked goat cheese

Yield: 4 servings
Ingredients
  • 1/4 cup olive oil
  • 1/4 cup shallot, minced
  • 2 tablespoons balsamic vinegar
  • 1 teaspoon Dijon mustard
  • 4 cups frisee
  • salt and pepper
  • 2 pounds asparagus
  • olive oil
  • kosher salt
  • black pepper
  • 1 cup flour
  • 1 egg, beaten
  • 1 cup milk
  • 2 cups panko breadcrumbs
  • 4 slices goat cheese (3/4 inch slices)
Cooking Directions
  1. Place the shallot and olive oil in a skillet and cook for 2 minutes over medium heat.
  2. Add the vinegar, mustard, salt, pepper, and stir well to incorporate. Set aside and cool to room temperature.
  3. Preheat the oven to 375 F.
  4. Break off the tough ends of the asparagus, and, if they're thick, peel them.
  5. Place the asparagus on a baking sheet, drizzle with olive oil, then toss to coat the asparagus completely. Spread the asparagus in a single layer and sprinkle liberally with salt and pepper.
  6. Roast the asparagus until tender but still crisp.
  7. Meanwhile, put the flour in one bowl, mix the egg and milk in one bowl, and put he breadcrumbs in one bowl.
  8. Dip the cheese slices into the flour, then the egg-milk wash, and then into the breadcrumbs, alternating your hands.
  9. Refrigerate until ready to use.
  10. When ready to use, turn the oven broiler to low. Place the goat cheese discs onto an oiled pan and place under the broiler on high. Broil until brown.
  11. Toss the frisee in the dressing until well-coated, then season with salt and pepper.
  12. Plate, and top each salad with a goat cheese disk and asparagus spears. Finish with extra salt and pepper.

February 27, 2015

Stuffed Peppers

No comments:
Yum
Stuffed peppers are incredibly easy, yet seem fancy and nostalgic at the same time. Of course you can have the filling be whatever you like, but the following recipe works pretty well. Some versions include and slightly watered-down ketchup that is poured over the filled peppers before adding the cheese on top, though we found that wasn't necessary and made it a little too sweet. Just keep the basic method for blanching the peppers the same, and you can go to town on whatever filling you want. Enjoy!


Stuffed Peppers

Yield: 4 servings
Ingredients
  • 4 bell peppers, tops removed, cored and seeded
  • 1/2 cup rice
  • 1 1/2 tablespoons olive oil
  • 1 onion, minced
  • 12 ounces ground meat
  • 3 garlic cloves, minced
  • 1 14.5 ounce can diced tomatoes, drained
  • 5 ounces (about 1 1/4 cups) cheese, shredded
  • 2 tablespoons fresh parsley, chopped
  • salt and pepper
Cooking Directions
  1. Boil 4 quarts of water with 1 tablespoon salt in a large pot. Cook peppers until they begin to soften, about 3 minutes. Remove and drain peppers with a slotted spoon or tongs.
  2. Add the rice to the pot and cook until tender, about 13 minutes. Drain rice and transfer to a large bowl.
  3. Heat the oil in a large skillet over medium-high heat. Add the onion, stirring occasionally, until it begins to brown, about 5 minutes. Add the ground meat, breaking it into small pieces until no longer pink, about 4 minutes. Stir in the garlic and cook for 30 seconds. Transfer to the bowl with the rice.
  4. Add the tomatoes, 1 cup of cheese, the parsley, and salt and pepper to taste.
  5. Heat the oven to 350 F with the rack in the middle.
  6. In a 9-inch square baking dish, place the peppers cut side up. Divide the filling evenly among the peppers. Sprinkle the rest of the cheese on top.
  7. Bake until the cheese in browned and the filling is heated through, 25 to 30 minutes. Serve immediately.