July 30, 2014

Waffle Awesome

No comments:
Yum
Inspired by the delicious Double Awesome of renowned Boston food truck fame, we present the Waffle Awesome. Instead of a scallion pancake, how about a scallion waffle? Using the yummy sourdough waffle recipe, we added scallions to the batter, but you can take any waffle and just add the scallions on top of the egg. So awesome! Enjoy!

Waffle Awesome

Yield: 1 waffle awesome
Ingredients
  • 1 waffle
  • 1 egg
  • 1 oz cheese
  • 1 scallion, sliced
  • sriracha
Cooking Directions
  1. Poach or cook the egg sunny side up.
  2. Toast a delicious sourdough waffle, but not too crispy. Cut in half.
  3. Top one half with your favorite cheese, the egg, and the scallion. Place the other half on top.
  4. Have some sriracha handy for extra spicy dipping fun.

July 09, 2014

No-Knead Artisan Bread (Whole Wheat version too)

No comments:
Yum
Here's a method without the need for a Dutch oven. Use a pan that is oven-safe, such as a cast-iron skillet. Use a metal baking dish on the bottom rack. The hot water will go into that dish when the bread goes in the oven, creating a similar steaming effect to the Dutch oven method. Voila, artisan bread! Enjoy!


No-Knead Artisan Bread

Yield: 1 large loaf
Ingredients
  • 560 g all-purpose flour (or whole wheat)
  • 1/2 teaspoon yeast
  • 2 teaspoons salt
  • 472 g water, about 70 degrees F
    •  520 g water if using 100% whole wheat
Cooking Directions if not using a Dutch oven
  1. Mix the flour, yeast, and salt in a large bowl. Add the water and stir until mixed. It will be a very sticky dough.
  2. Cover the bowl with plastic wrap or something similar. Let the dough rest for about 24-48 hours at about 70°F. It's fine if it's longer. The dough is ready when its surface is dotted with bubbles. Fold the dough once or twice during this time.
  3. Fold once or twice. Cover loosely with plastic wrap and let rest for about 15 minutes.
  4. Gently and quickly shape the dough into a ball. Leave in the bowl. If a ball does not form, don't worry about it. Cover with a towel or plastic wrap and let rise for about 2 hours. When it’s ready, the dough will be more than doubled in size.
  5. About 15-20 minutes before the dough is ready (the end of the 2 hours), heat the oven to 450°F. Put an oven-safe pan on the middle rack of the oven as it heats. Put a metal rimmed sheet or baking dish on the bottom rack as well.
  6. When the dough is ready, carefully remove the pan from the oven and turn the dough over into the pan. It won't be graceful, so just get it all in there as quickly as possible. Fill the sheet or dish on the bottom rack with 2 cups of very hot water immediately after you put the dough in the oven.
  7. Bake for 50-60 minutes, until the loaf is beautifully browned. Remove the bread and let cool on a rack.

Cooking Directions if using a Dutch oven

  1. Mix the flour, yeast, and salt in a large bowl. Add the water and stir until mixed. It will be a very sticky dough.
  2. Cover the bowl with plastic wrap or something similar. Let the dough rest for about 24-48 hours at about 70°F. It's fine if it's longer. The dough is ready when its surface is dotted with bubbles. Fold the dough once or twice during this time.
  3. Fold once or twice. Cover loosely with plastic wrap and let rest for about 15 minutes.
  4. Gently and quickly shape the dough into a ball. Put it on a piece of parchment paper. Put it back into a clean bowl if you want to keep a ball-like shape more. If a ball does not form, don't worry about it. Cover with a towel or plastic wrap and let rise for about 2 hours. When it’s ready, the dough will be more than doubled in size.
  5. About 30 minutes before the dough is ready (the end of the 2 hours), heat the oven to 450°F. Put a Dutch oven on the middle rack of the oven as it heats.
  6. When the dough is ready, carefully remove the Dutch oven from the oven and pick up the dough by the parchment paper and place into the Dutch oven. Spray the top of the dough with water and put the lid back on. Then get it into the oven.
  7. Bake for 30 minutes with the lid on, then remove the lid and bake for another 20 minutes, until the loaf is beautifully browned. Remove the bread and let cool on a rack.


June 25, 2014

The Best Roasted Brussels Sprouts

No comments:
Yum
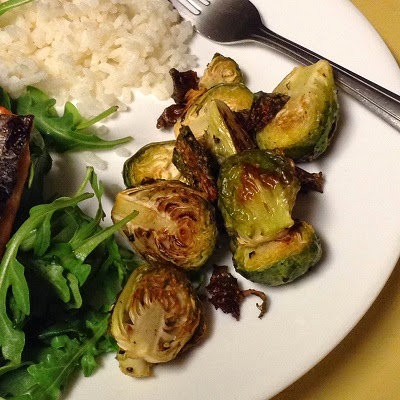
They say simplest roasting is sometimes the best way to roast. I tend to agree. And what could be simpler than a little olive oil, kosher salt, and freshly ground black pepper?

The roasting brings out the holy-cow-I-didn't-know-Brussels-sprouts-could-be-this-delicious aspect we've all been looking for from this tiny little cabbage. Enjoy!

The Best Roasted Brussels Sprouts

Yield: 4 servings
Ingredients
  • 1 lb Brussels sprouts
  • 1 tablespoon olive oil
  • 1/2 teaspoon kosher salt
  • 1 teaspoon fresh black pepper
Cooking Directions
  1. Heat oven to 400 F.
  2. Cut off bottoms of Brussels sprouts and cut sprouts in half.
  3. In a large bowl, toss sprouts with 1 tablespoon of olive oil and the salt and pepper.
  4. Place on a large baking sheet and put on the middle rack of the oven.
  5. Cook for 15-20 minutes, flipping once and removing extra crispy pieces.
  6. They are done when soft on the inside.

June 05, 2014

Crispy Skin Salmon

No comments:
Yum
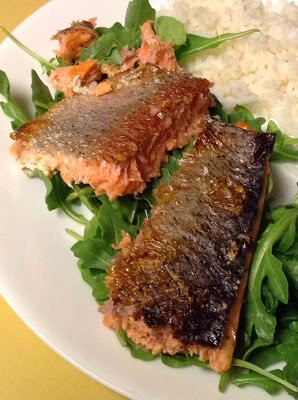
Usually, salmon is cooked so that the skin is discarded before or after cooking. Or, if it's scaled, it's soft, though still tasty. This is a mistake. Salmon skin is delicious. And when it's crispy, it's divine.

Yes, you'll have to scale the filet. Which sucks. It's just not fun, though it's not hard. But it is well worth it. Enjoy!


Crispy Skin Salmon
Yield: 4-8 servings
Ingredients
  • 1-2 lb salmon filet
  • 1-2 tablespoons oil
  • salt and pepper
  • optional: lemon juice
Cooking Directions
  1. Scale the filet. Set the oven to broil.
  2. Place in a baking dish large enough so that it lays flat.
  3. Pat dry, and rub oil over both sides of the salmon, also making sure the bottom of the dish is oiled.
  4. Salt and pepper both sides as well.
  5. Set the filet skin side up.
  6. Place the dish 4 inches from the broiler.
  7. The salmon is done when the skin is starting to darken, is crispy, and the rest of the filet appears cooked through.
  8. Serve immediately. If desired, splash some lemon juice underneath while plating, so as not to ruin the crispy skin.

May 14, 2014

Homemade Tamales

No comments:
Yum
Did you know that the singular form of tamales is tamal? Now you'll never order a tamale again. You're welcome.

Homemade Tamales

Yield: 48-60 tamales
Ingredients
  • 1/8 cup chili powder
  • 1 teaspoon kosher salt
  • 1 tablespoon paprika
  • 1/2 tablespoon garlic powder
  • 1/2 tablespoon onion powder
  • 1 teaspoon cayenne pepper
  • 1 teaspoon black pepper
  • 1/2 teaspoon cumin
  • 2 lbs cooked meat
  • 4 to 5 dozen dried corn husks
  • 2 lbs masa (yellow cornmeal)
  • 1 1/2 tablespoons kosher salt
  • 1 tablespoon baking powder
  • 7 1/2 oz (about 1 cup) lard
  • 3 to 4 cups liquid
Cooking Directions
    For the meat:
  1. In a small bowl, combine the chili powder, kosher salt, paprika, smoked paprika, garlic powder, onion powder, cayenne pepper, black pepper and cumin.
  2. Mix onto whatever cooked meat filling you already have.

    For the wrappers:
  3. Place the husks in a large bowl or container and submerge completely in hot water. Soak the husks until they are soft and pliable, at least 45 minutes and up to 2 hours.

    For the dough:
  4. Place the cornmeal, salt, and baking powder into a large mixing bowl and combine. Add the lard and, using your hands, knead together until the lard is well incorporated into the dry mixture. Gradually add enough of the reserved liquid, 3 to 4 cups, to create a dough that is like thick mashed potatoes. The dough should be moist but not wet. Cover the bowl with a damp towel and set aside until ready to use.

    To assemble the tamales:
  5. Remove a corn husks from the water and pat dry to remove excess water. Working in batches of 6, lay the husks on a towel and spread about 2 tablespoons of the dough in an even layer across the wide end of the husk to within 1/2-inch of the edges. Spoon about 1 tablespoon of the meat mixture in a line down the center of the dough. Roll the husk so the dough surrounds the meat, then fold the bottom under to finish creating the tamale. Repeat until all husks, dough, and filling are used. Optionally, tie the tamales, around the center, individually or in groups of 3, with kitchen twine.

    To cook the tamales:
  6. Stand the tamales upright on their folded ends, tightly packed together on a steamer in a large pot. Add enough water so the liquid comes almost to the bottom of the tamales. Try not to pour the broth directly into the tops of the tamales. Cover, place over high heat and bring to a boil. Remove the lid, reduce the heat to low to maintain a low simmer, and cook until the dough is firm and pulls away easily from the husk, 1 to 1 1/2 hours.
  7. Serve the tamales warm. For a 'wet' hot tamale, serve with additional simmering liquid. Store leftover tamales tightly wrapped in plastic wrap in the freezer. To reheat, remove the plastic wrap and steam until heated through.
  8. Leftover masa can be stored in the freezer as well.
Based on Alton Brown's recipe.